TetraPoland PoC — operating manual v1.0
How to get the app running on a radio without a touchscreen and work on the network from the keys alone — from the SELF CARE password and the first login, through talkgroups, the channel knob and private calls, to troubleshooting.
The manual for TetraPoland PoC — the build for PoC radios without a touchscreen (the Hytera P50 and its kind). The app works on the same network as TetraPoland for phones and the TetraSpot base stations, but it is operated entirely from the keys: the D-pad, the PTT trigger, the channel knob, and the Menu, Back and handset keys.
This document describes version 0.1.4. Every screenshot comes from the app running on a Hytera P50.
The phone app (Android and iPhone) has its own manual — that one has a touchscreen and different controls. The TetraSpot base station has another.
How to read this manual
| Marker | Meaning |
|---|---|
| centre | a press of the D-pad centre (OK) |
| hold | holding the D-pad centre for half a second |
| ← → ↑ ↓ | D-pad directions |
| ⚠️ | a trap — where people most often stumble |
The app speaks Polish and English. The language is set in Settings; by default it follows the radio's own language.
1Before you start — what you need
TetraPoland PoC turns a PoC radio (one that uses the cellular network instead of radio waves) into a terminal of the TETRA Poland network: PTT group calls, private calls, SDS text messages and your position on the map.
You need three things, and all three are arranged outside the app:
| What | Where from | Notes |
|---|---|---|
| Callsign | your licence | this is how others see you |
| DMR ID | radioid.net ↗ | a seven-digit number tied to your callsign; Polish ones start with 260 |
| SELF CARE password | brandmeister.network ↗ → SelfCare → Hotspot Security | this is what you log in with — without it you will not even reach the Polish hub |
The SELF CARE password is not your BrandMeister website password. It is a separate password from the Hotspot Security section. If you have never set one, set it now, before you start.
If the same DMR ID is already used on another device (a phone, a hotspot), add a two-digit suffix on the radio — e.g. 2601231 → 260123101. Each device then holds its own BrandMeister session and they stop knocking each other off.
You do not need a server address — the hub and the gateway are built into the app.
2Installation
The app is not in the Play store, and the radio will not install it on its own. The APK is on tetra-poland.pl/en/download ↗, in the TetraPoland PoC section.
For the Hytera P50 and most PoC radios the right variant is armeabi-v7a. If you are not sure which one to take, take the universal build — it runs everywhere, it is just larger.
Install it the way you install any app on this radio:
- with the manufacturer's tool for managing the radio, or
- from a computer:
adb install -r tetrapoland-poc-armeabi-v7a.apk.
The radio's firmware does not let an app install an update by itself. The app checks for a newer version and can download it, but the system refuses the install with "User install is not allowed" — a new release has to be put on the radio by hand, exactly like the first one. See chapter 17.
After installing, the radio asks for permissions: microphone, notifications and location (the last one is needed for the map position and for the wireless PTT button). Grant all of them — without the microphone you cannot transmit, and without notifications the system will kill the app in the background.
3The keys — the whole philosophy in five points
The controls follow a radio, not a phone:
- A short press of the centre selects. It runs whatever the yellow frame is standing on.
- Holding the centre opens that item's menu. On a group: group list, favourite, scan. On a subscriber: PTT, duplex, SDS. On a contact: also favourite and delete.
- ← goes back — from every screen, from every position, wherever the cursor happens to be; the Back key does the same. On the main screen both do nothing (by design: Back must not throw you out of the app).
- In long lists → and ← jump by 10 entries, and the list wraps around — ↓ on the last entry returns to the first.
- The yellow frame is the cursor. You can always see what the centre key will do.
The radio's other keys:
| Key | What it does |
|---|---|
| PTT (trigger) | transmits on the selected group; in a live private call you talk; on a ringing private call it answers and starts transmitting straight away |
| green handset | answers an incoming call, hangs up a live one; on a selected subscriber it places a duplex call |
| red handset | in a call: rejects / hangs up. Outside a call the firmware treats it as "home" — the app comes back on top half a second later, on its main screen |
| MENU | opens the app menu; pressed inside the menu, closes it |
| channel knob | steps through favourite groups (you need at least two) |
| volume +/− | receive volume |
If the knob does not change groups, the firmware has almost certainly locked the channel — see chapter 18.
4First run — network settings
Without these the app will not log in. MENU → Settings → Network.
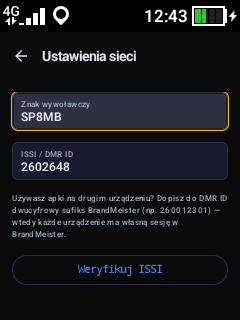
- Callsign — your callsign.
- ISSI / DMR ID — your number from radioid.net (with a suffix if you use that ID elsewhere).
- Verify ISSI — checks the number against the radioid database and tells you whether it matches the callsign.
Further down the same screen sits the password:
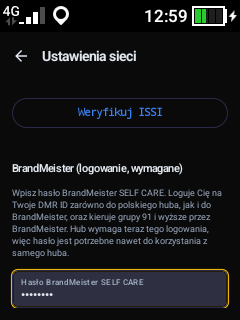
- BrandMeister SELF CARE password — this is what logs you in to the hub and to BrandMeister.
At the very bottom:
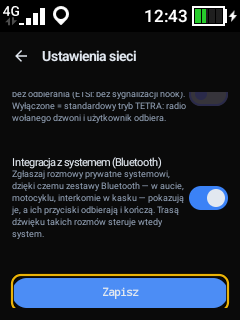
- Private call set-up — whether your radio should ring on an incoming call (the TETRA standard) or let the voice straight through (direct mode, no signalling).
- System call integration (Bluetooth) — registers private calls with Android, so headsets and car kits can answer and hang up with their own button.
- Save — only this writes the changes. Leaving with ← discards them.
The app logs in by itself after saving. You can see it on the main screen: TP and BM in the top bar turn green.
5The main screen
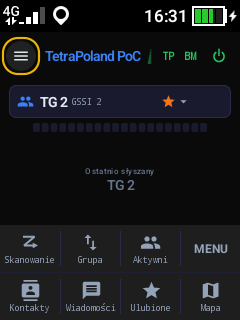
From the top:
- Top bar — the menu icon (☰), the app name with the link-quality indicator, and on the right TP (the Polish hub) and BM (BrandMeister): green = logged in, orange = connecting, red = logged out or refused. The last icon logs in and out of the network. The centre key on the app name explains what the quality indicator means.
- Group card — one line: the group name, its GSSI and a star if the group is a favourite. Centre = the group list, hold = the group's menu.
- Level meter — it moves when somebody is speaking or when you are transmitting.
- Talker panel — the largest area on the screen. When somebody transmits, their callsign is here in the biggest type that fits, with the ISSI below it. When the air is quiet, the panel reminds you who was heard last.
- Two key bars — the top one: Scan, Group, Online, MENU; the bottom one: Contacts, Messages, Favorites, Map. The Group cell steps to the next favourite talkgroup (hold it for the previous one) — the knob's job on a key, for the case where the firmware locks the knob away; with fewer than two favourites it opens the group list instead. The audio route joins as a fifth cell only when there is a second output to switch to, i.e. when a Bluetooth headset is connected (a radio with one speaker does not need that button).
5.1 Transmitting
Press and hold the PTT trigger. The middle of the screen turns red and the panel shows the group you are transmitting on — you can see from across the room that the radio is on the air.
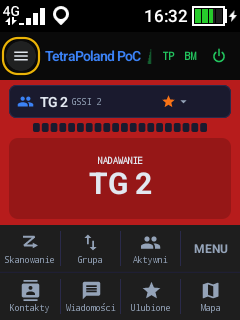
Stop talking and release the trigger. The top bar and the key bars deliberately stay black — while transmitting you can still read the network state and the key labels.
Only one person holds the group at a time. If somebody else is transmitting at that moment, the app tells you so with an orange bar instead of letting you on the air.
5.2 Receiving
When somebody transmits, the talker panel turns green and shows their callsign (or just the ISSI if you do not have them in contacts — chapter 10).
5.3 Audio route
When the radio has more than one output (a Bluetooth headset), the top bar gains a cell showing where the sound goes. The centre key switches to the next output, holding it opens the list:
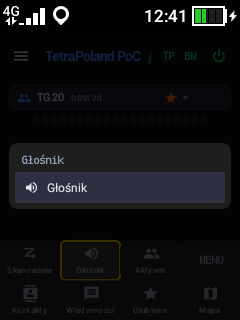
On the Hytera P50 the earpiece exists on paper only — the system reports it, but nothing comes out of it. The app knows this and does not offer it on that radio: you are left with the loudspeaker and Bluetooth when a headset is connected.
6Groups
6.1 Choosing a group
The centre key on the group card opens the list of all groups. The cursor starts in the search field — you can search by name and by number:
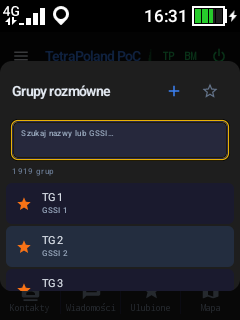
↓ from the search enters the list, ↑ leaves it for the header buttons: "+" adds a group by hand, the star shows favourites only.
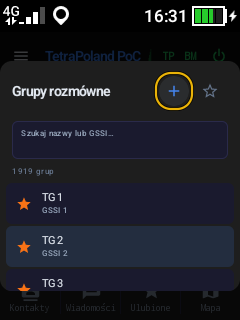
A short press selects the group, holding it adds the group to favourites. → and ← jump ten entries at a time — with a couple of thousand groups that is the only sane way to move.
Groups 1–90 are the Polish network, 91 and above are BrandMeister. The split lives in the hub: above 90 you talk through BrandMeister, which is why the SELF CARE password is mandatory.
6.2 The group menu
Hold the centre key on the group card:
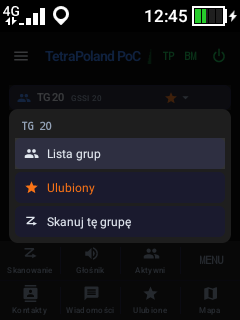
- Group list — the same as a short press.
- Favorite — adds or removes the star. Favourites are the groups the knob walks through.
- Scan this group — adds the group to the scan list.
6.3 The knob
The knob steps through favourite groups only, in a loop. With one favourite or none, the app says so instead of pretending something happened.
7Scanning
MENU → Scan, or hold the Scan cell in the key bar:
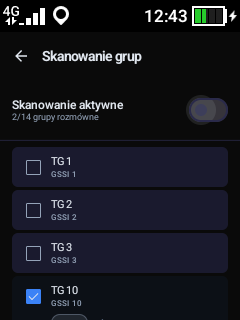
At the top there is the Scan Active switch, below it the list of groups with checkboxes — tick the ones you want to listen to. When the scanner picks up traffic, the group card on the main screen turns orange and shows the group that is transmitting.
How the scanner behaves is set in Settings → Scanner:
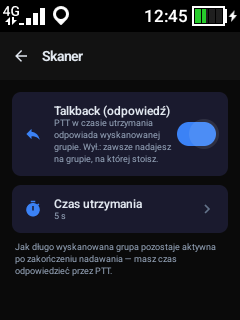
- Talkback — with it on, PTT replies on the group you are hearing; with it off you always transmit on your own selected group.
- Hold time — how long a scanned group stays active after it stops transmitting, so you have time to reply.
8Who is on the network — "Online"
The third cell of the top bar opens the list of everyone logged in to the hub: apps, radios and gateways.
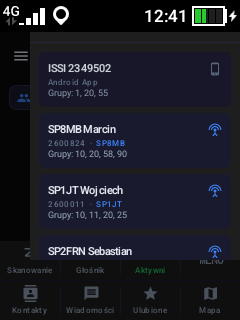
Each row: callsign and ISSI, an icon (antenna = a radio through a gateway, phone = an app) and the groups they are affiliated to.
On the selected subscriber:
- centre — a simplex private call (PTT, like on a radio),
- green handset — a duplex call (both sides talk at once, like a phone),
- hold — a menu with the same options plus Send SDS:
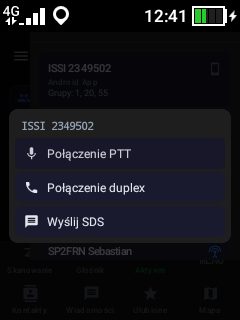
9Private calls
Outgoing. Pick a subscriber (from the online list, contacts, favourites or the call log) and press the centre key (simplex) or the green handset (duplex). The call screen shows the peer's callsign and ISSI in large type, the state ("Calling…", "Connected"), the level meter, the selected audio route and a hint line saying what the keys do right now.
Incoming. The radio rings and the caller's callsign fills the screen:
- green handset — answers,
- PTT trigger — answers as well; on a simplex call it starts transmitting immediately, so you can simply press the trigger and talk,
- ← / Back / red handset — rejects.
Hanging up. The green handset or ←. A simplex call in which nobody has said anything for a while hangs up by itself — there is a countdown on the screen.
Leaving the call screen ends the call. That is deliberate: were it left running in the background, it would block group audio for the rest of the session.
10Contacts and the DMR database import
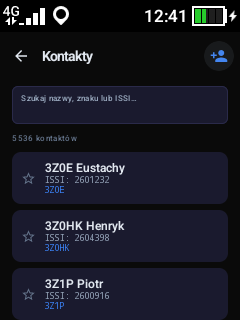
A list with a search by name, callsign and number. A short press calls (simplex), holding opens the menu:
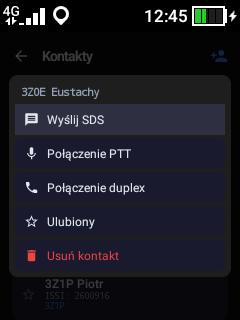
Send SDS · PTT call · Duplex call · Favorite · Delete contact.
A single contact is added with the + icon in the bar, but typing in a few thousand callsigns by hand makes no sense — that is what the import is for: Settings → Import contacts & groups.
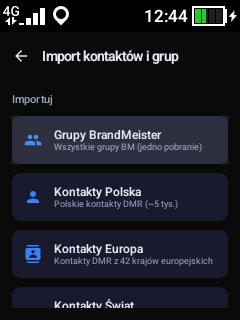
- BrandMeister Groups — every BM talkgroup (a single download).
- Contacts Poland — the Polish DMR database (about 5,000 entries).
- Contacts Europe — DMR IDs from 42 European countries.
- Contacts World — the whole database.
After the import you see callsigns and names instead of bare numbers — in the talker panel, in the online list and in the call log.
11SDS messages
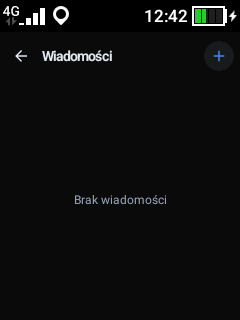
A list of conversations; the + icon in the bar starts a new one:
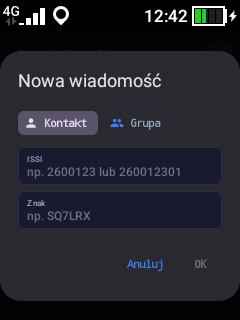
You choose whether you are writing to a contact or to a group, give the number (or the callsign) and the text.
11.1 The on-screen keyboard
A radio without a touchscreen has no system keyboard, so the app carries its own, driven by the D-pad:
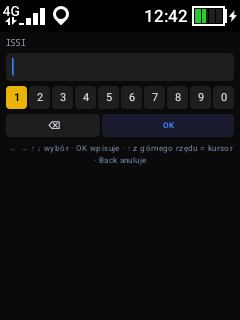
- the D-pad picks a character, the centre types it,
- the top row is digits,
123switches to symbols and back, - ↑ from the top row enters the text field — then ← and → move the caret and ⌫ deletes the character before it (you can fix a typo in the middle without deleting the rest),
- ↓ or the centre returns from the field to the keyboard, Back cancels everything.
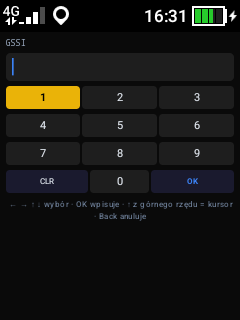
In fields that take digits only (ISSI, GSSI, the recipient's number) the keyboard looks like a phone's: the digits in a 3×3 grid and, in the bottom row where a phone has * and #, CLR (deletes a character) and OK:
Delivery and read receipts work exactly as in the phone app.
12Favourites
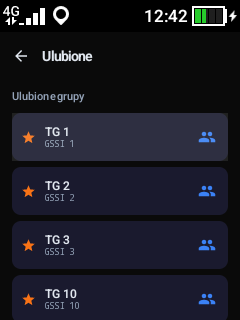
One list: favourite groups first, then favourite people. A short press selects the group or places the call, holding opens the item's menu. The list wraps around, and → and ← jump by ten.
It is the favourite groups that the knob walks through — so it pays to keep on this list the handful you actually use.
13Call log
MENU → Calls:
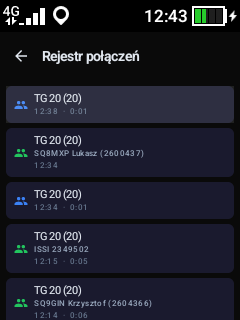
Who, when, how long and in which direction. A short press calls back (for a private call) or selects the group (for a group call); holding opens the item's menu.
14Map and GPS position
The last cell of the bottom bar opens the network map — the same stations and the same users as the map on tetra-poland.pl ↗:
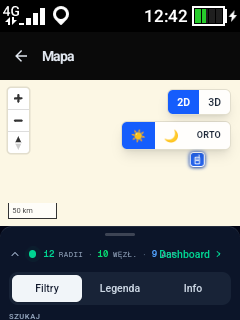
You send your own position from Settings → GPS position:
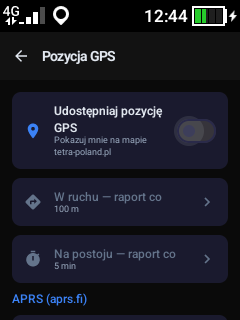
- Share GPS position — the master switch.
- Moving — report every and Stationary — report every — how often the position goes out, separately for driving and standing still.
- APRS (aprs.fi) — additionally sends the position into the APRS-IS network under your callsign.
Below that:
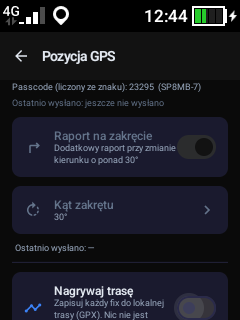
- Report on turns and Turn angle — an extra report when the heading changes, so the track does not cut corners.
- Record track — writes a GPX file into the radio's storage; nothing is sent anywhere.
15Sound
Settings → Audio:
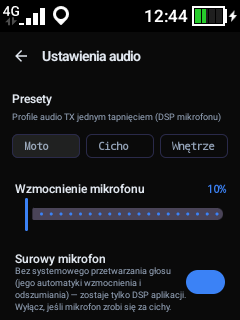
- Presets — three ready-made transmit profiles: Moto, Quiet, Indoor.
- Mic Gain — the most important slider. Too quiet? Up. Clipping? Down.
- Raw microphone — skips the system's own voice processing (its automatic gain and noise suppression) and leaves the work to the app's filters. On radios it is on by default; switch it off if the microphone gets too quiet.
- Receive on the media stream — receive audio runs on the music stream (15 volume steps) instead of the call stream (7). On a radio it is on by default, because "one step too loud" used to be the daily reality.
- RX Volume — the level on the app's side.
The rest sits below:
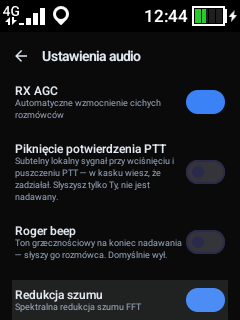
RX AGC lifts quiet callers, the PTT confirmation beep is a local tone on press and release (only you hear it), the Roger beep is the courtesy tone at the end of a transmission (others hear it; off by default), Noise Reduction and AGC work on the transmit path, and under the Advanced TX DSP header live the expert settings:
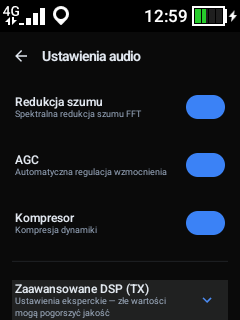
Leave the advanced DSP alone unless you have a reason. Wrong values degrade the audio, and it is the other side that hears it, not you.
15.1 Working a slider without a touchscreen
The sliders have their own adjust mode:
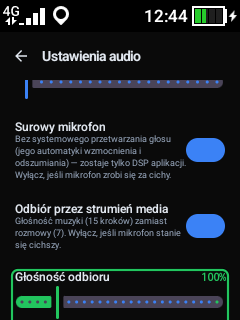
- Stand on the slider and press the centre — the frame turns green.
- ← and → change the value.
- Centre or Back finishes and saves.
Outside adjust mode ← behaves normally, i.e. it leaves the screen.
16Hardware buttons
Settings → Hardware buttons:
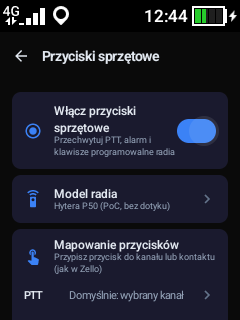
- Enable hardware buttons — capture of the PTT, emergency and programmable keys.
- Radio model — the hardware profile. For the P50 it is Hytera P50 (PoC, no touchscreen); there are also profiles for Motorola, Hiroyasu and "other radio" with key learning.
- Button mapping — assigning a key to a group or to a contact:
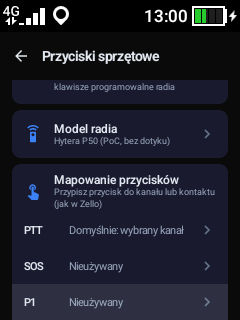
PTT transmits on the selected group by default, but you can give it a group of its own — then a press transmits on that group and selects it. SOS and the P1/P2 keys work the same way. Further down the same screen is the wireless PTT button (BLE) — pairing comes down to switching Bluetooth on and pressing the button.
16.1 The alarm key
The orange key on top of the radio is the only one the firmware leaves alone — there is no system alarm behind it — so you decide what it does, separately for a short press and for a hold:
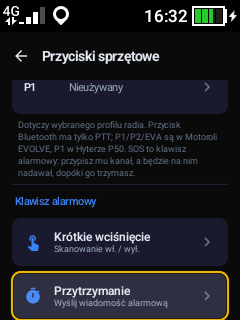
- Short press — scanning on / off by default.
- Press and hold (over half a second) — sends the alarm message by default.
- Both offer: Nothing, Scanning on / off, Send the alarm message.
- You write the alarm text yourself and pick the recipient from your favourite contacts (star a contact in Contacts first, or the list will be empty).
With no recipient or no text nothing is sent — the radio says what is missing. And if you mapped the alarm key to a channel or a contact under Button mapping, that mapping wins: the key transmits instead of doing any of the above.
17Updating the app
The app checks for a newer release by itself — at every launch and once an hour in the background. You can also check on the spot: Settings → Update.
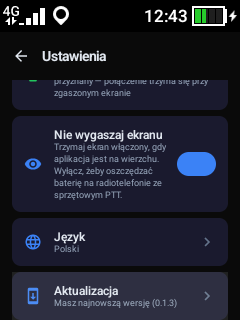
The row says plainly what it found: "You have the latest version", "Version X available — press to install", or the reason it failed. The release-notes window is D-pad operated: ↑ and ↓ scroll the notes, Update downloads, Later puts it off.
On the Hytera P50 (and its relatives) the system refuses an install started by the app. The update will download, but you have to install it by hand — with the manufacturer's tool or over ADB, just like the first installation (chapter 2).
18When something does not work
The knob does not change groups. Two reasons, both easy. First: you need at least two favourite groups — the knob only walks through those. Second: the firmware can lock the channel (there is a padlock next to the channel in the radio launcher's control centre). The app cannot unlock it — Android does not let a third-party app change the manufacturer's system settings. Unlock the padlock in the launcher, or from a computer: adb shell settings put system knob_locked 0.
Nothing is heard after switching to the earpiece. On the P50 the earpiece is only declared, it does not actually play. The app skips it on that model; if you meet other hardware with the same quirk, pick the loudspeaker.
The app keeps coming back to the front. That is intended: the red handset on the P50 is "home" as far as the firmware is concerned, and a radio must not be left showing an empty launcher while the link is up. To leave for real, use MENU → Exit.
The microphone is too quiet or clipping. First Mic Gain, then Raw microphone (on = without the system's automatics). The change is audible on the receiving side — the parrot is the best place to check it.
The update ends with an install error. That is the firmware block, see chapter 17.
TP or BM is red. Check the SELF CARE password and the ISSI in Settings → Network. If the same DMR ID is in use on another device, add a suffix (chapter 1).
The app falls asleep in the background and calls arrive late. Settings → Background operation shows whether the radio has battery optimisation lifted for the app; one press fixes it.
19Appendix: what each key does
| Key | Main screen | In a list | In a call |
|---|---|---|---|
| ↑ ↓ | cursor across elements | one entry up / down, wrapping around | — |
| ← → | cursor along the key bars | page up / down (10 entries) | ← = hang up |
| centre (short) | runs the selected item | selects the entry | switches the audio route |
| centre (hold) | the selected item's menu | the entry's menu | — |
| PTT | transmits on the group | — | you talk; on a ringing call it answers |
| green | duplex to the selected subscriber | duplex | answers / hangs up |
| red | back to the main screen | back | rejects / hangs up |
| MENU | the app menu | — | — |
| knob | next / previous favourite group | — | — |
| volume | receive volume | receive volume | receive volume |
20Appendix: how it differs from the phone app
| Feature | PoC (keys) | Phone (touch) |
|---|---|---|
| Group and private calls | ✅ | ✅ |
| SDS messages | ✅ | ✅ |
| Scanning with talkback | ✅ | ✅ |
| Contacts and radioid import | ✅ | ✅ |
| Map, position, APRS | ✅ | ✅ |
| On-screen PTT button | ❌ (not needed — there is a trigger) | ✅ |
| Side drawers, gestures | ❌ | ✅ |
| The app's own keyboard | ✅ | ❌ (the system one) |
| Channel knob | ✅ | ❌ |
| Automatic install of updates | ❌ (firmware block) | ✅ |
| Watch app | ❌ | ✅ |
| Home-screen widget | ❌ | ✅ |
TetraPoland PoC — by sp8mb. This manual describes version 0.1.4.
This manual covers TetraPoland PoC 0.1.4.