TetraSpot — Operating Manual v1.0
How to bring up and run your own TetraSpot station — from the first login to the panel, through joining the network, to troubleshooting. All from a browser, with screenshots from a live station.
Operating manual for the TetraSpot TETRA Base Station. Everything is done through the web panel — no config files to edit, no SSH needed.
Screenshots come from a live station (SP8MB).
Configuration through files and the command line is covered by a separate advanced manual — it is not published here; ask for it on the TETRA-POLAND Telegram group ↗ or by e-mail at marcin@sp8mb.pl.
1Before you start — getting into the panel
Open the panel in a browser at the station's IP address: http://<station-address>/. If you don't know the address, the station brings up its own WiFi network (TetraSpot) by default, and the panel is reachable at the gateway address once you join it.
The panel is password-protected. There are two roles: admin (full rights) and viewer (read-only). Passwords are set under Security → Web panel access.

The bar across the top stays visible on every tab:
| Element | Meaning |
|---|---|
| TetraSpot / by … | station callsign, software version and build |
| ISSI | the station's own subscriber number |
| NET | networked mode — the station works with the central switch |
| Radio TX | transmitter on/off — one click stops emission |
| WiFi | current mode and network name |
| Power | restart and shut down the station |
| Dark | light/dark theme switch |
Below it, the tabs: Dashboard · Calls · TMO · Interconnect · Map · System · Security · Suppl. Services · Codeplug · Radio Info · Air Monitor · Packet data.
The interface language is switched under System → Settings.
1.1 Radio TX — turning the transmitter on and off
The Radio TX button shows the transmitter state (ON / OFF) and toggles it with one click. The panel asks for confirmation, because the effect is immediate.
Turning it off is useful for antenna work, retuning and measurements — the station stays up and reachable through the panel, but stops radiating.
Once off, every radio loses the network and will report no service shortly after. When you switch it back on they have to register again, which takes a dozen seconds or so.
1.2 WiFi
The WiFi button opens the wireless panel:
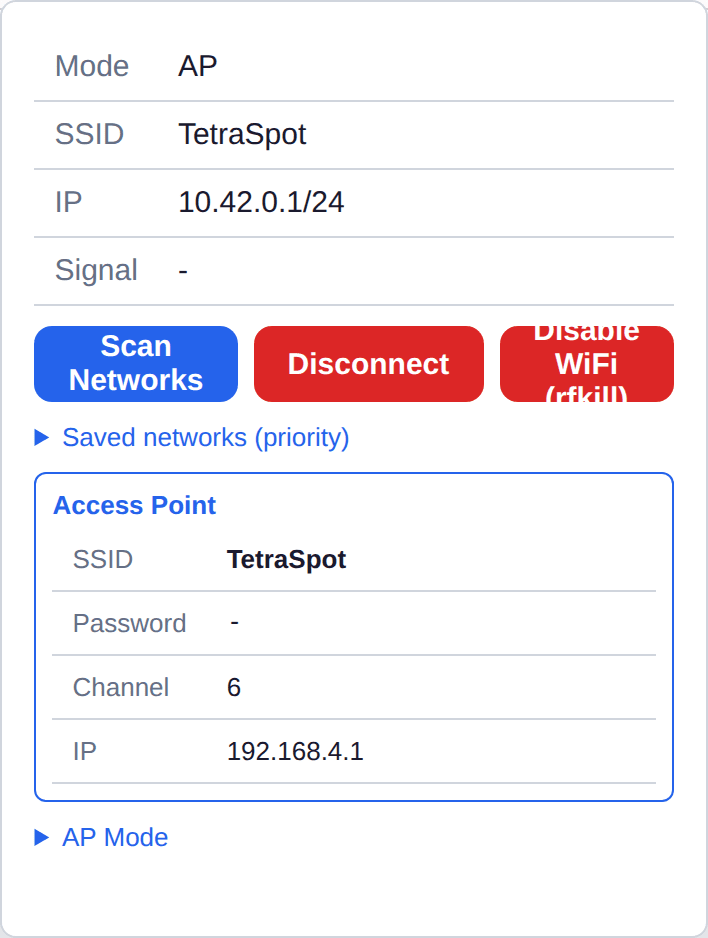
The top part shows the current state: mode (AP or client), SSID, IP address and signal strength.
The station runs in one of two modes:
- Access point (AP) — the station broadcasts its own network (TetraSpot by default) and hands out addresses. This is how you reach the panel in the field with no infrastructure at all. The Access Point card shows the SSID, password, channel and the address the panel sits on.
- Client — the station joins an existing network. Click Scan Networks, pick one from the list and enter the password.
The rest:
| Button / section | What it does |
|---|---|
| Scan Networks | finds networks in range and lets you connect |
| Disconnect | drops the current network |
| Disable WiFi (rfkill) | switches the WiFi radio off in hardware |
| Saved networks (priority) | remembered networks and the order they are tried in |
| AP Mode | switches to access point and back to client |
The chosen mode is persistent — after a restart the station comes back the way you left it.
Disabling WiFi via rfkill is a hardware switch-off. You cannot undo it over WiFi, because you have just turned WiFi off — you will need a cable. The same applies when switching to client mode: get the network password wrong and you lose access to the station.
1.3 Power — restart and shutdown
The Power button opens two commands:
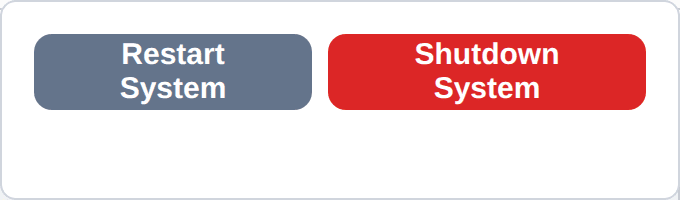
- Restart System — a full restart. The station comes back on its own after about a minute.
- Shutdown System — a clean shutdown and power-off.
Both ask for confirmation.
A shutdown cannot be undone remotely. The station will not come back by itself — somebody has to go and power it up physically. If it sits on a mast or in somebody else's house, think twice. For an ordinary "something got stuck", restarting a single service under System → Services is enough.
2Step 1: connecting to the Hub
The Hub (hub.tetra-poland.pl) links stations to each other. Without it your station works alone: radios register and talk locally, but hear nobody from other stations.
There is exactly one field to fill in. Go to the Interconnect tab and find the Poland Client card:

Steps:
- In Site Name, enter your station's name — normally your callsign, e.g.
SP8MB. It must be unique across the network; the station appears under this name on the hub. - Click Save config.
- Click Restart on the same card.
- After a moment the card header should show a green LOGGED IN (SP8MB).
The hub address (hub.tetra-poland.pl:4450) is fixed — the field is informational and does not need changing.
Checking from the hub side. Above the client card sits the TetraPoland Hub card with the state of the whole network — how many stations are connected, how many subscribers, and which calls are running:
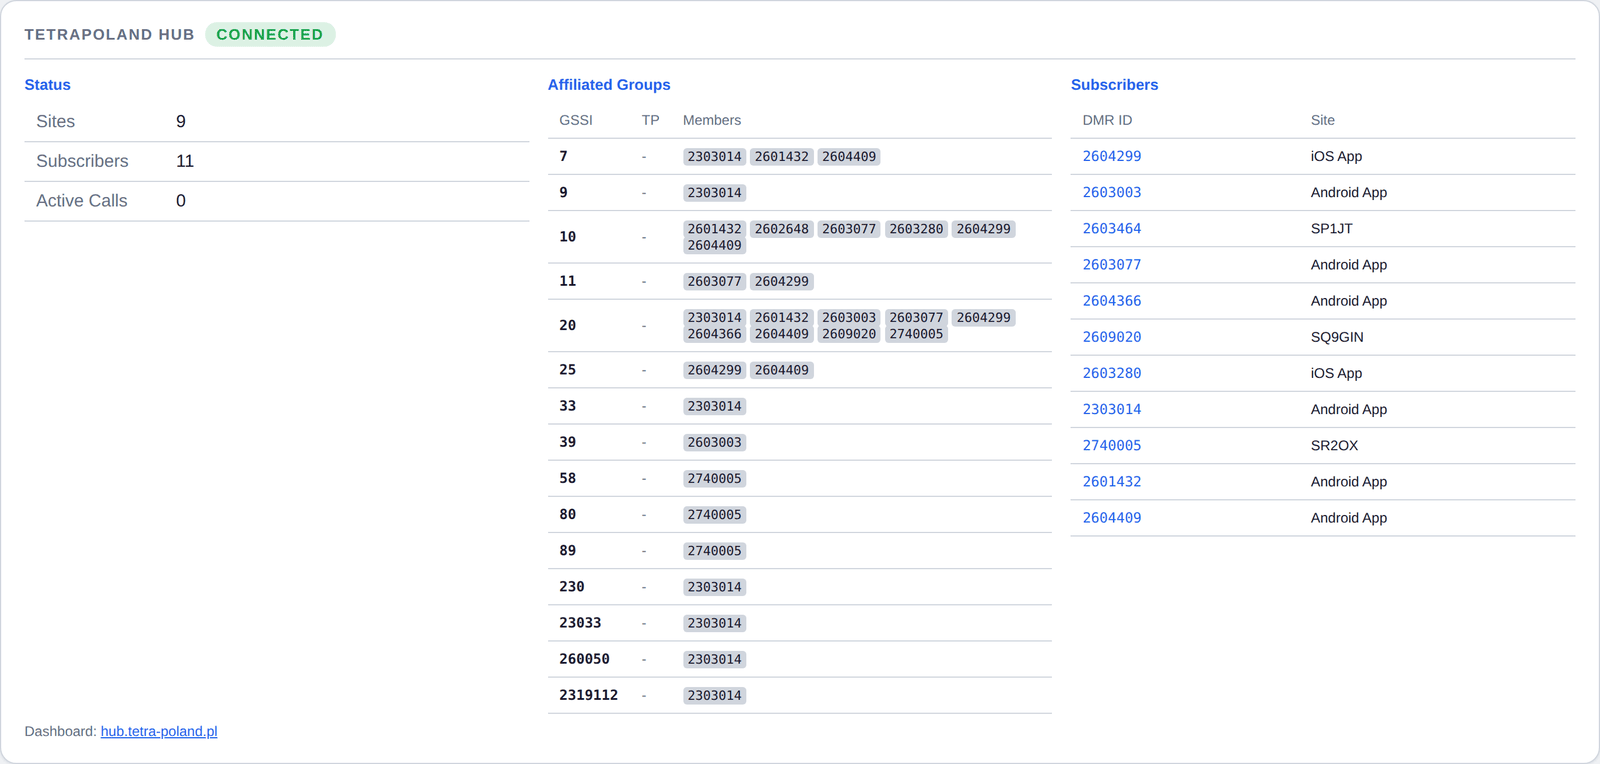
If you see CONNECTED and your station in the list, the hub is working.
For your station to register its radios' ISSIs on the hub, its base DMR ID must be on the hub's list of permitted gateways. Without that the client logs in, but the hub rejects radio registrations in a loop every 15 seconds. If that happens, contact the hub operator — this cannot be fixed on your side.
3Step 2: connecting to BrandMeister
BrandMeister is reached through the TetraPack core. There are two fields to fill in: login and password.
Same Interconnect tab, the BrandMeister card:
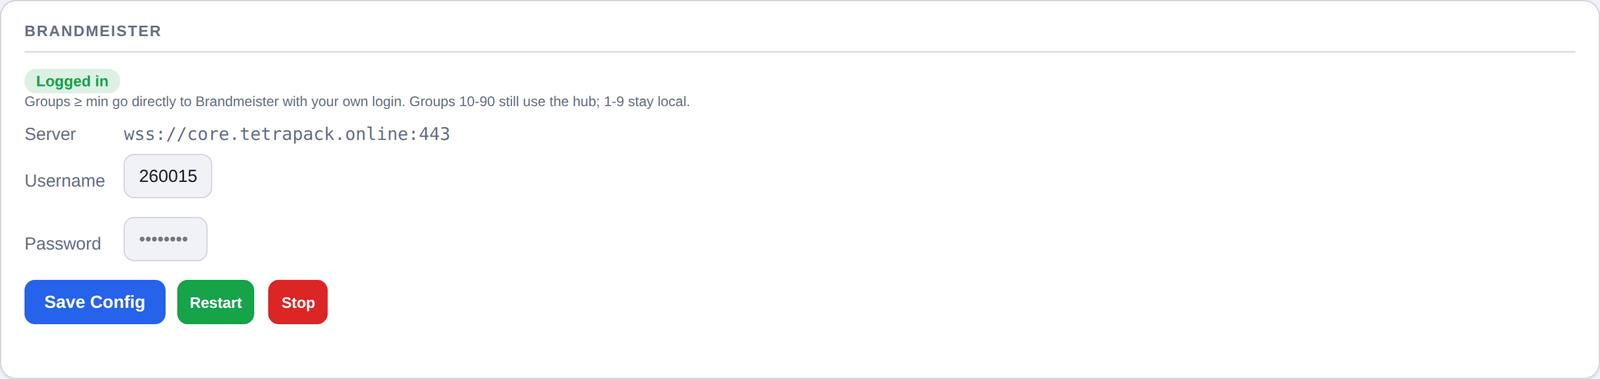
Steps:
- Username — your BrandMeister hotspot login: DMR ID plus a two-digit suffix, e.g.
2600824 05. - Password — your BrandMeister hotspot password (not your website account password).
- Click Save config, then Restart.
- The card should show a green Logged in.
The server address (wss://core.tetrapack.online:443) is fixed and needs no setting. The station's ISSI is derived from the login automatically — the device suffix is trimmed so the number fits in 24 bits.
Leaving the password field empty on save means "keep the current password". It is not cleared — so when correcting just the login you don't have to retype the password.
Once logged in, groups numbered 91 and above go straight to BrandMeister under your login.
4Step 3: checking that radios register
Open the Dashboard. This is the station's main control screen:
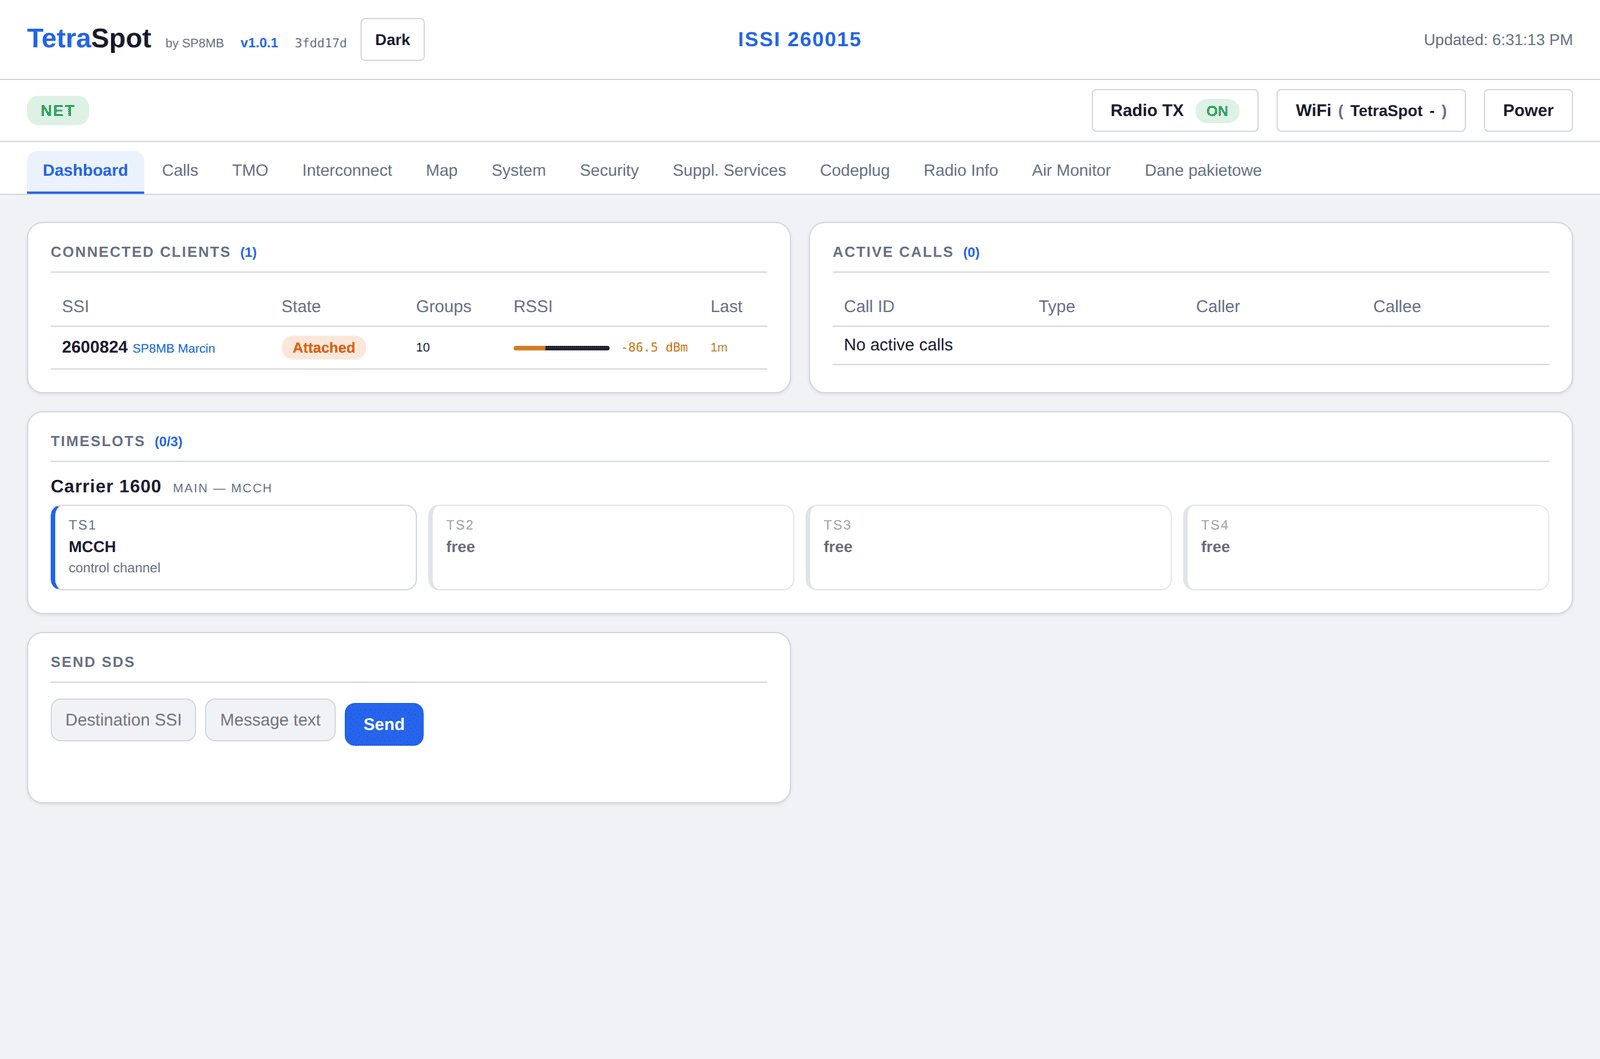
What to read:
- Connected clients — registered radios: SSI, state (
Attached= registered and attached to groups), number of groups, RSSI (signal strength from radio to station) and time since last activity. A few green seconds under Last means the radio is currently active. - Active calls — conversations in progress.
- Timeslots — how the radio resource is being used. One carrier gives 4 slots, of which TS1 is the MCCH (control channel, always busy) — leaving 3 for calls and data.
- Send SDS — a quick text message to a radio (SSI) or a group (GSSI).
If a radio won't register, check in this order:
- Whether the radio's codeplug has the same MCC/MNC, colour code and Location Area as the station (the TMO tab).
- Whether Radio TX at the top of the panel is ON.
- Whether the radio is being filtered out by the whitelist under Security → Auth control — see section 7.
- Whether the radio has Mutual Authentication enabled while the station holds no key for it — the most common cause of "the radio sees the station but keeps dropping".
5Group split — where each call goes
The group number decides where a conversation goes:
| Group number (GSSI) | Goes to | Handled by |
|---|---|---|
| 1–9 | stays local, inside your cell only | — |
| 10–90 | TetraPoland Hub — other stations hear it | Poland Client |
| 91 and above | BrandMeister | BrandMeister |
The split is a convention, but it must be the same across the whole network. If group 20 goes to BrandMeister on your station while everyone else keeps it on the hub, that group goes silent for you.
For a radio to hear a group, the group must be in its codeplug and the radio attached to it. A group can also be granted remotely, with no reprogramming — see DGNA.
6Radio configuration — the TMO tab
Everything to do with transmission: frequencies, network identity and cell parameters.
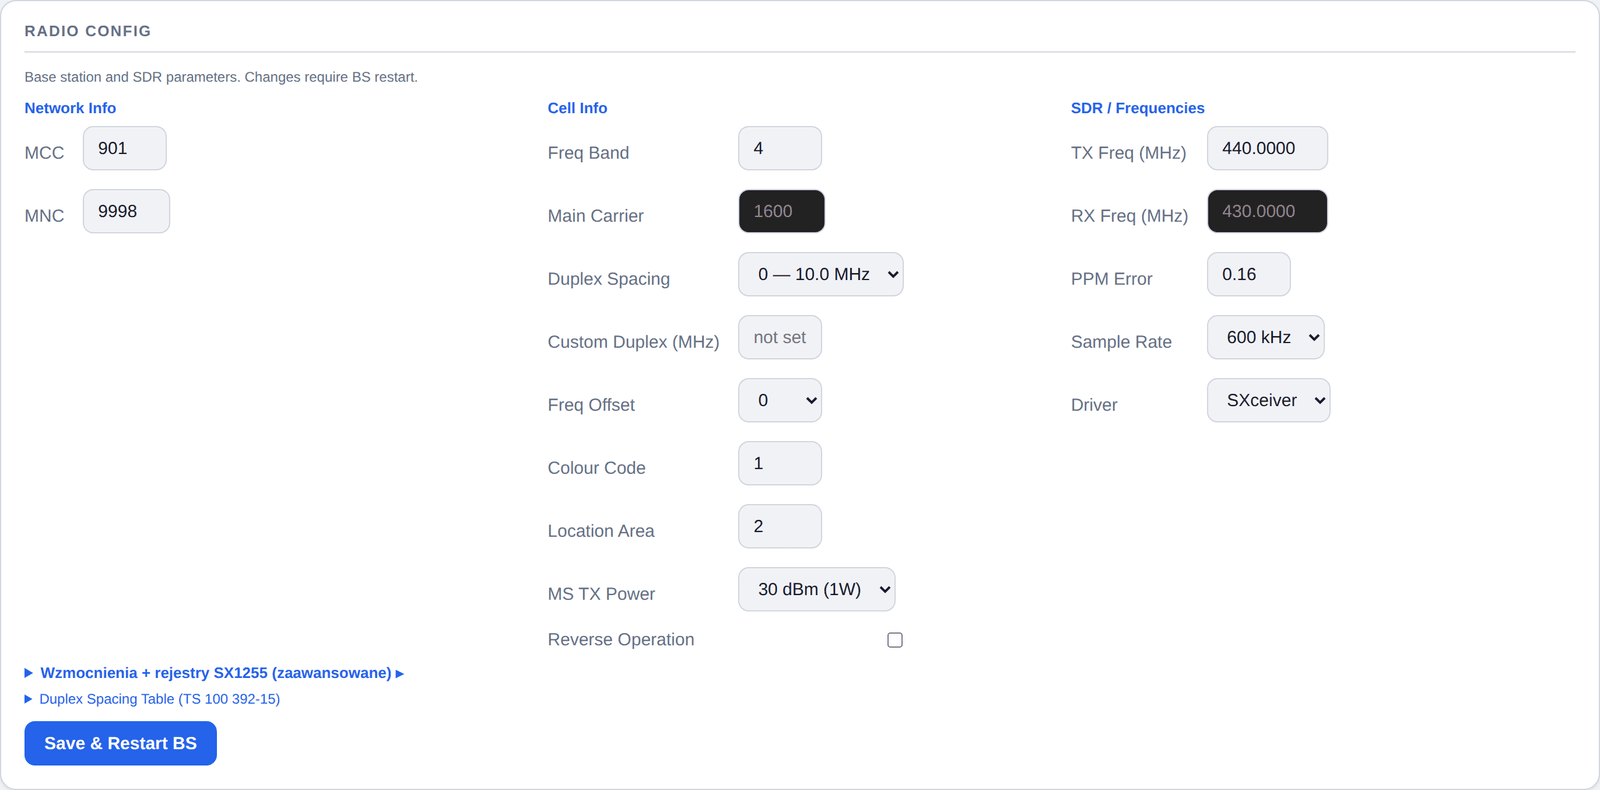
6.1 Network identity
| Field | Meaning |
|---|---|
| MCC | country code |
| MNC | TETRA network number within the country |
For the station to work in our network, set MCC = 901 and MNC = 9998. These are the values used across the whole system — anything else cuts the station off from the rest of the network, even if it transmits perfectly well on its own.
MCC and MNC must be identical to the radio's codeplug — otherwise the radio will not accept the station as its own network.
6.2 Cell parameters
| Field | Meaning |
|---|---|
| Freq Band | band; 4 = 400–500 MHz (standard TETRA) |
| Main Carrier | carrier number; calculated automatically from the TX frequency |
| Duplex Spacing | duplex offset from the ETSI table; usually 10 MHz in the 400 band |
| Colour Code | 0–3, distinguishes neighbouring stations on the same frequency |
| Location Area | location area, used for registration and paging |
| MS TX Power | maximum power a radio may transmit in this cell |
Colour Code and Location Area must also match the radio's programming.
6.3 Frequencies and SDR
| Field | Meaning |
|---|---|
| TX Freq | the frequency the station transmits on (radios listen here) |
| RX Freq | the frequency the station receives on; derived from TX and the duplex offset |
| PPM Error | oscillator error correction |
| Driver | which SDR hardware is in use |
| Gains | transmit and receive gain settings |
Too little transmit gain produces a classic symptom: the radio sees the carrier but cannot register, and reports the network as unavailable. If that happens, raise the TX gain.
Apply changes with Save & Restart BS. The station stops transmitting for a dozen seconds or so.
6.4 Service flags
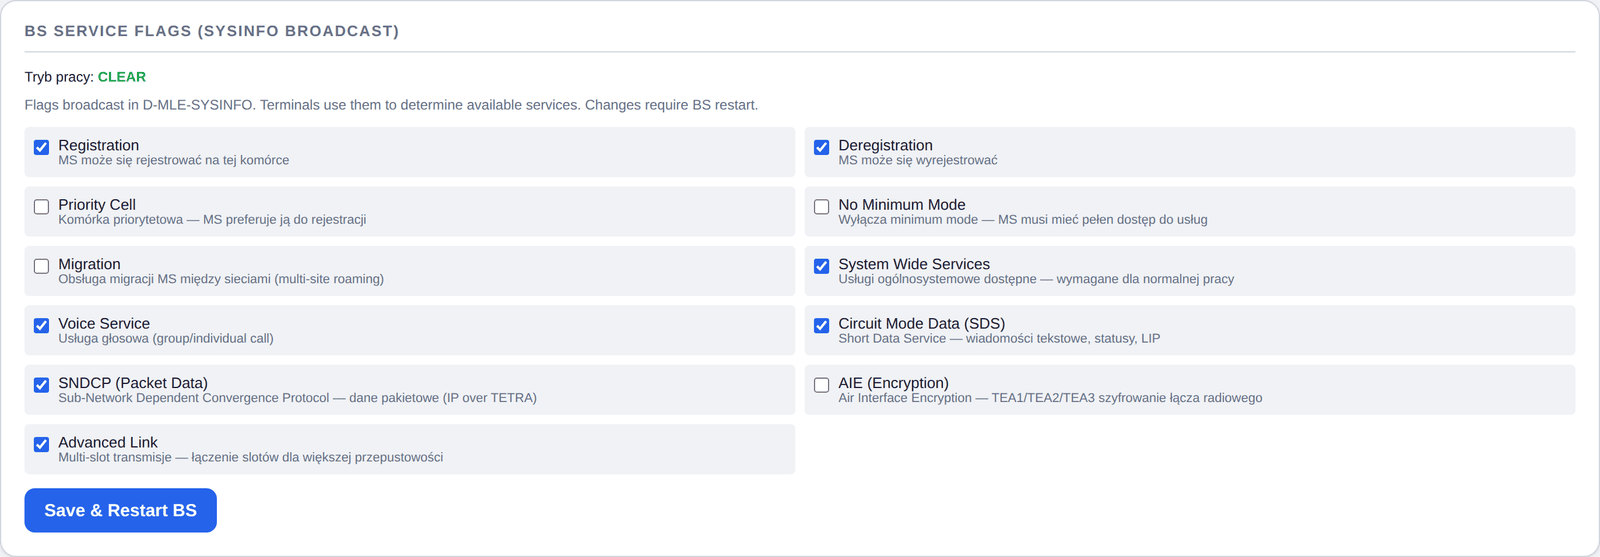
The station broadcasts a list of available services, and radios decide what they can use from it. The important ones: voice service, packet data (required for internet on the radio) and encryption.
6.5 Second carrier (Dual Carrier)
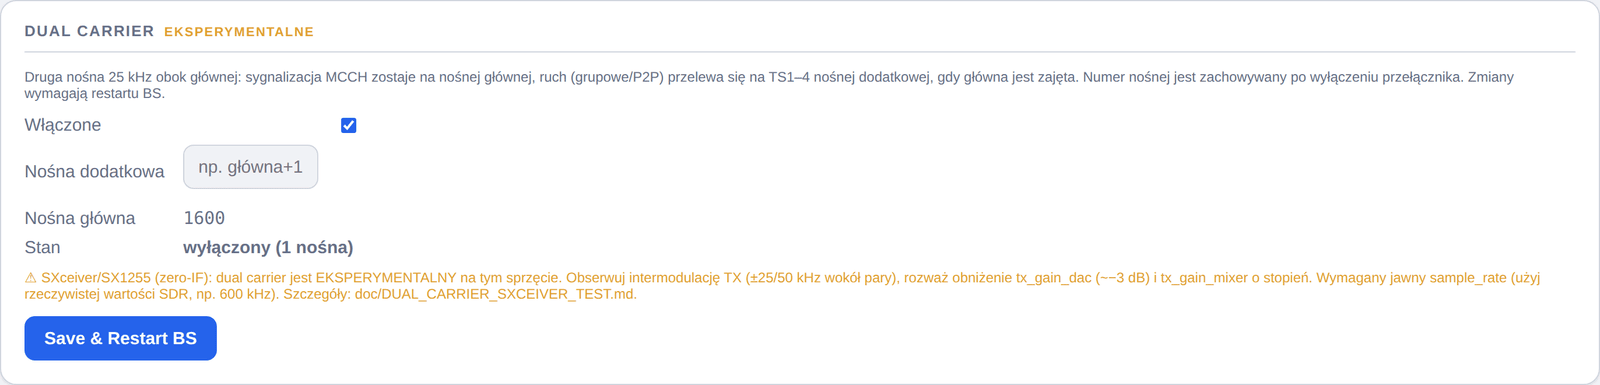
The station can transmit on two carriers at once. The second carrier adds four more timeslots — all for calls and data, since the control channel stays on the main carrier. It is the simplest way to stop packet data from starving voice.
6.6 Calibration

The panel can measure and correct oscillator error (PPM calibration) and IQ imbalance (IQ calibration). Each has Run, Verify and Apply — you run the calibration first, then commit it.
7Terminals and authorisation — Security
7.1 Panel access
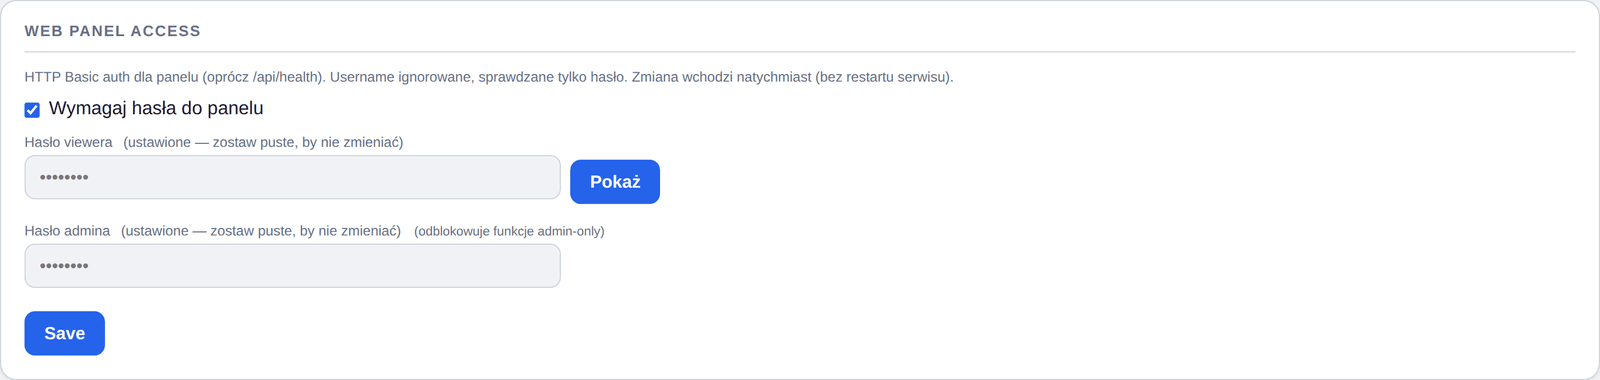
Set the admin and viewer passwords here, and whether a login is required at all.
7.2 Who may register to the network

Two modes:
- Whitelist on — only radios entered in the database and flagged as allowed may register. This is how a closed network runs.
- Whitelist off (bypass) — every radio is accepted, with no checking. Convenient when starting out and for testing.
A separate Ki authentication switch makes every radio that has a key in the database authenticate itself. Radios without a key are not challenged.
After a station restart, check that the mode is what you expect — it's easy to miss that the network has been left open.
7.3 Terminals and groups
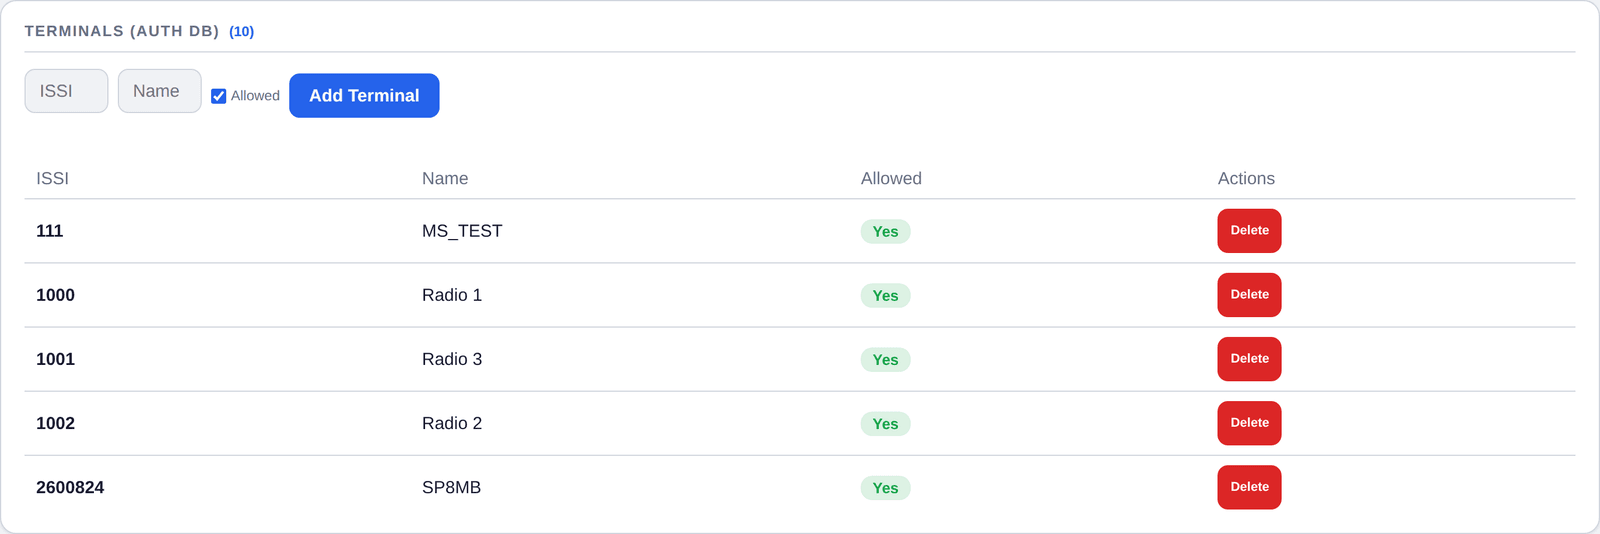
Add a radio: its ISSI, a name (e.g. callsign and operator) and the Allowed flag. The list shows every radio the station knows about; Delete removes an entry.
This is the list the whitelist checks — when it is on, only radios on this list and flagged as allowed may register.
The groups a radio belongs to come from its codeplug. An extra group can be granted over the air with DGNA — see section 10.1.
7.4 Encryption
Air interface encryption is not configured from the panel — this version has no such card on the Security tab. Keys and security class are set through a configuration file; see the advanced manual.
8Calls and messages
The Calls tab is the station's activity history.
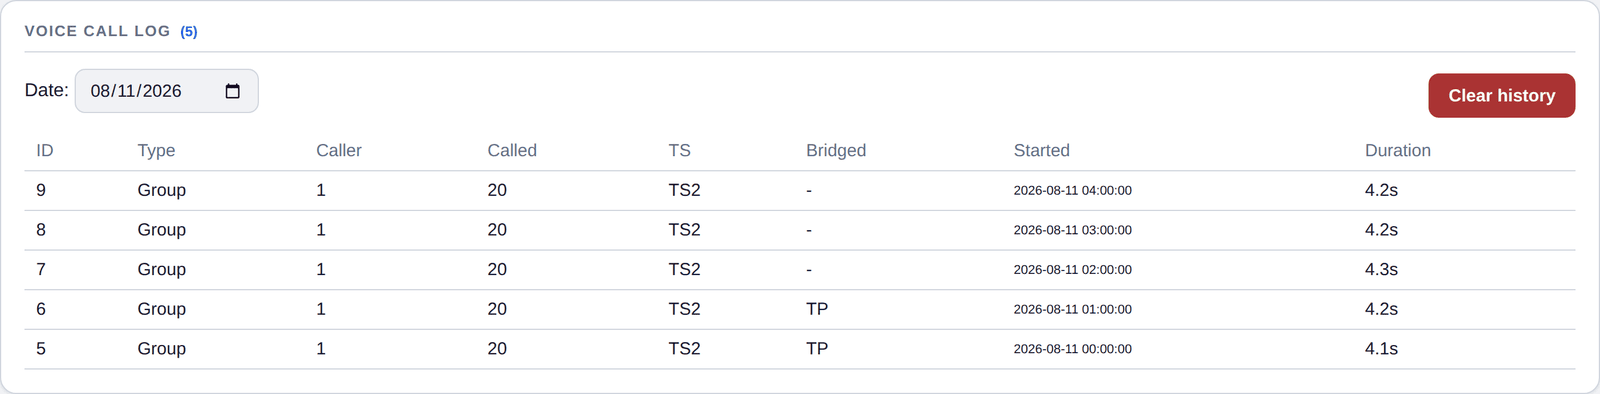
Voice call log — who called whom, when, for how long, on which timeslot, and whether the call was bridged outside (hub / BrandMeister).
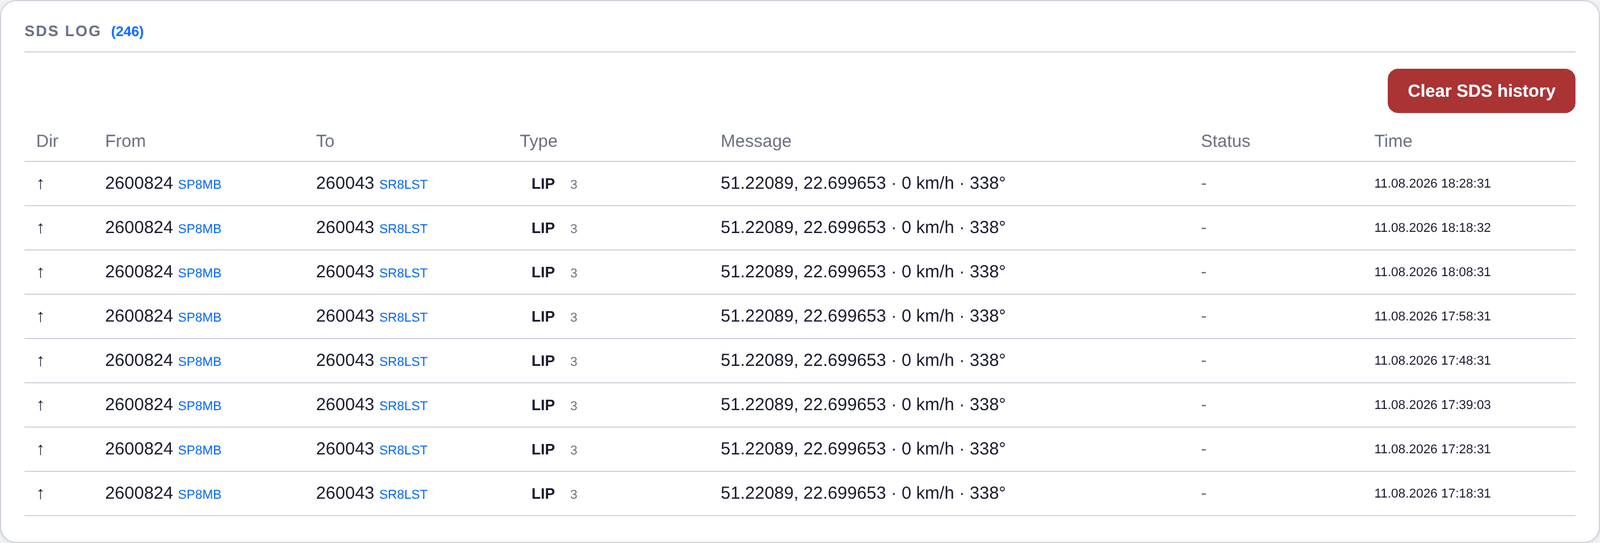
SDS log — text messages with delivery reports. Messages are sent from the Dashboard (Send SDS card): give a radio number (ISSI) or group number (GSSI) and the text.
History can be cleared with the buttons on each card.
Messages sent to a radio longer than 16 characters are sometimes silently lost — you get no error, they simply don't arrive. Keep them short.
9Map and APRS
The Map tab shows radios' GPS positions — current, plus historical tracks (pick a day and load the tracks).
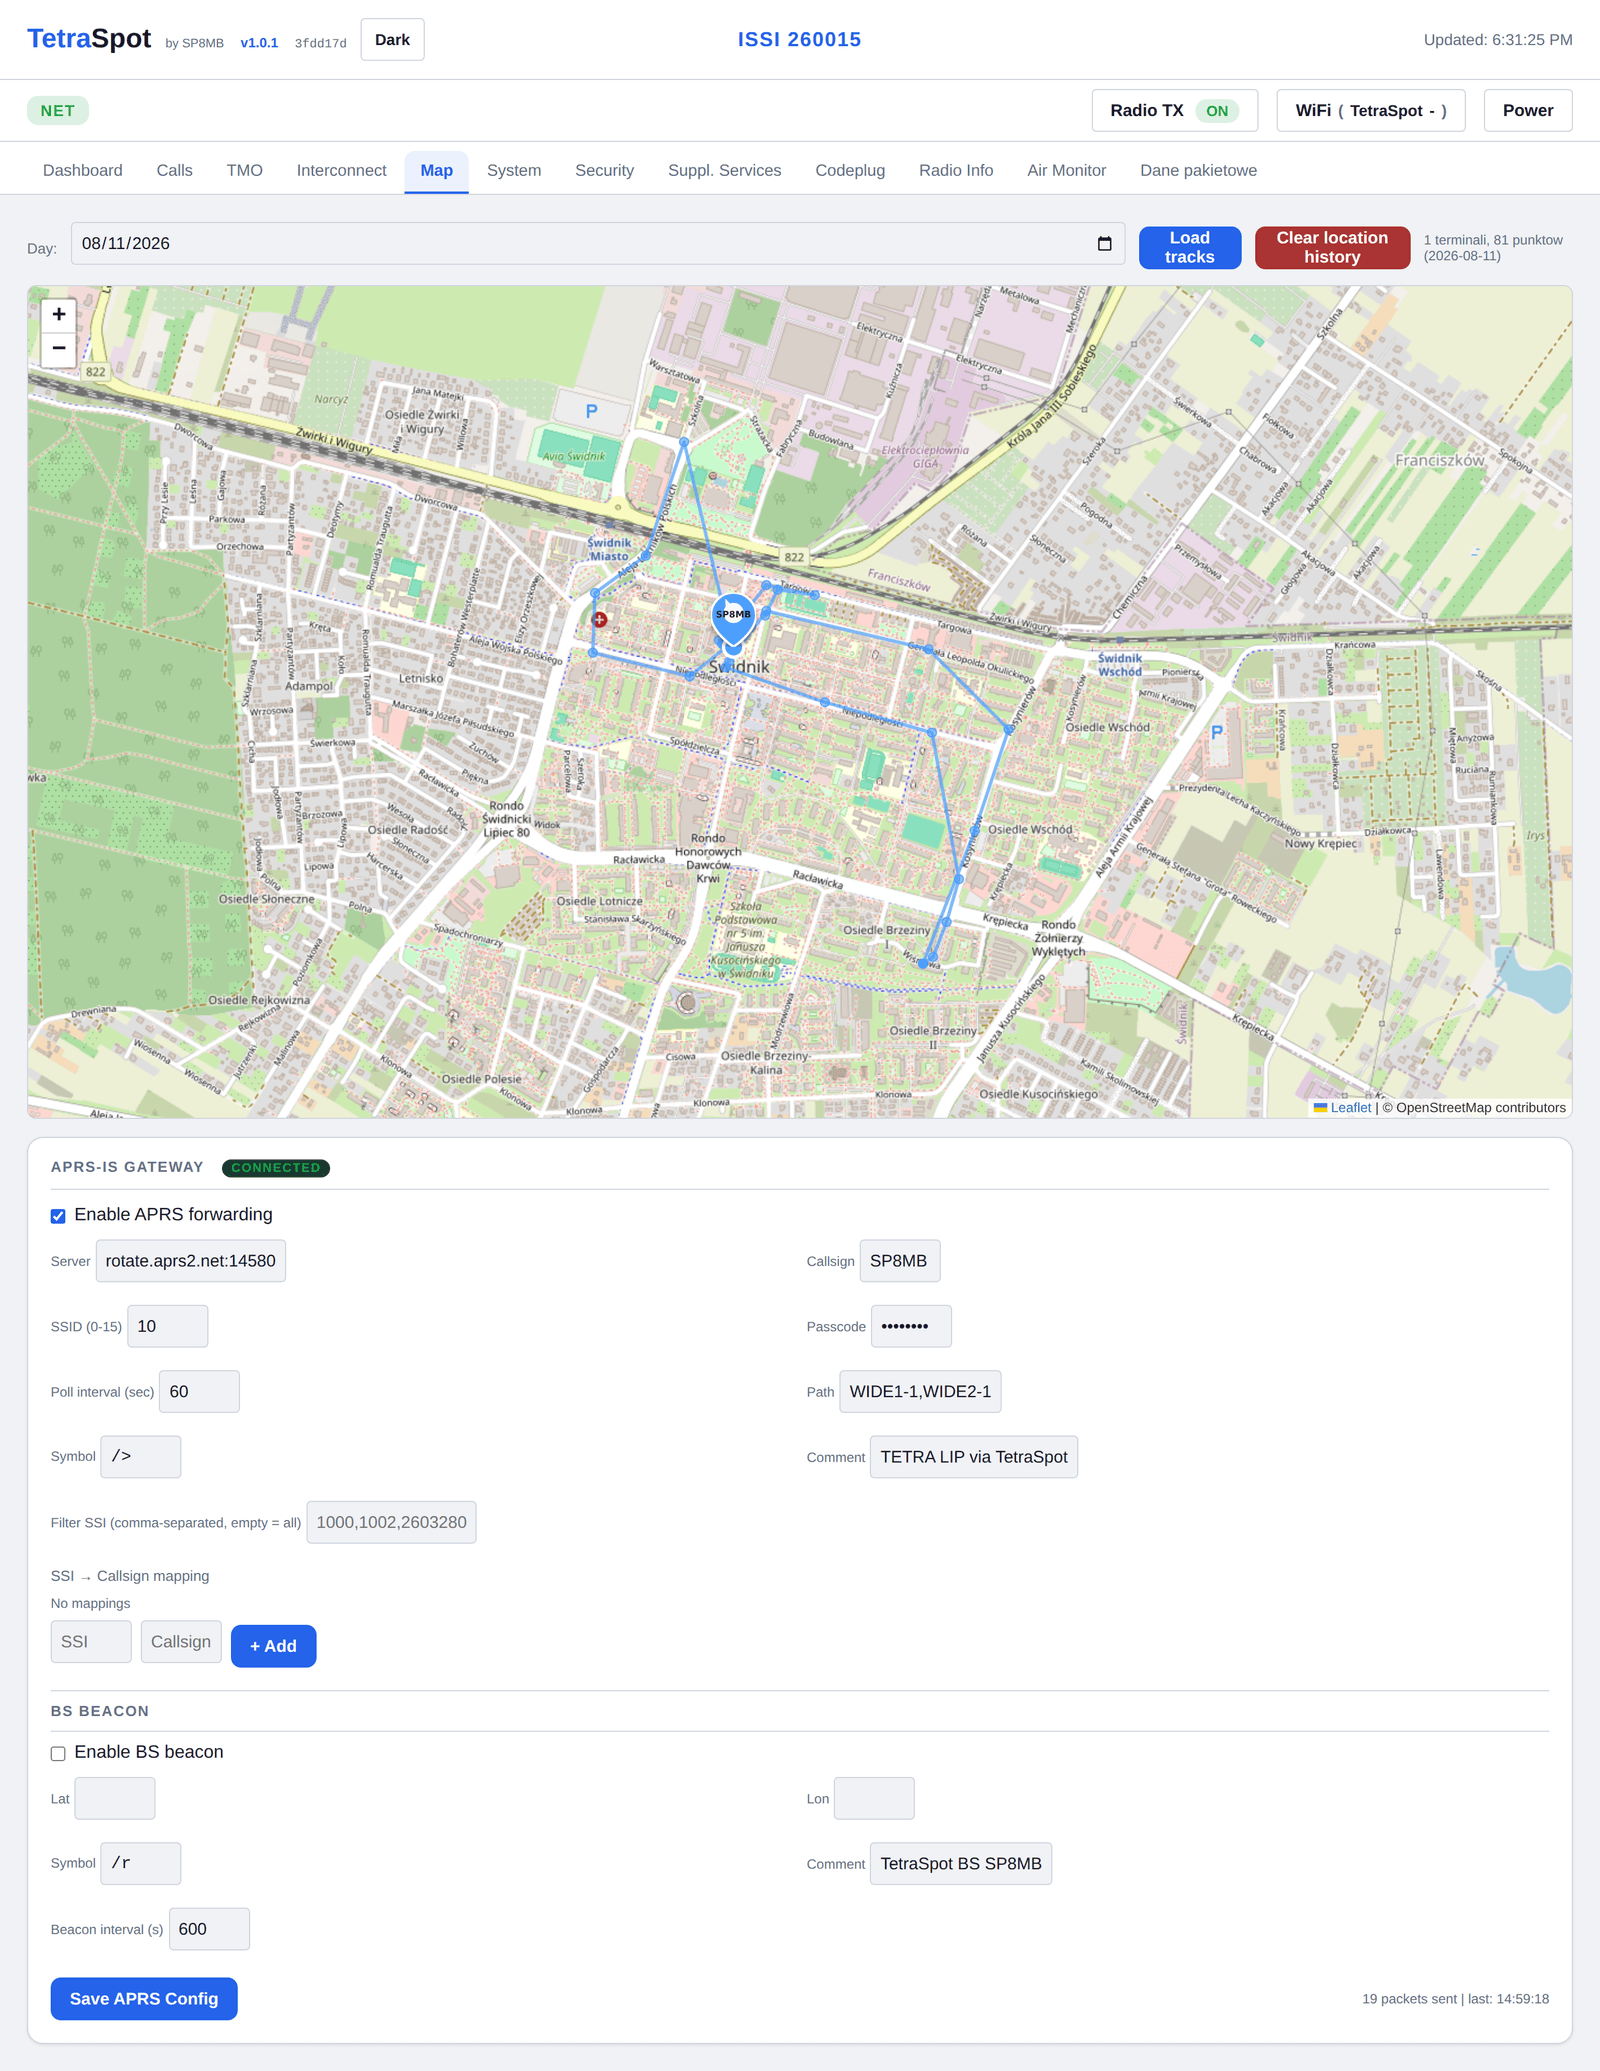
Below the map is the APRS-IS gateway, which forwards radio positions to aprs.fi:
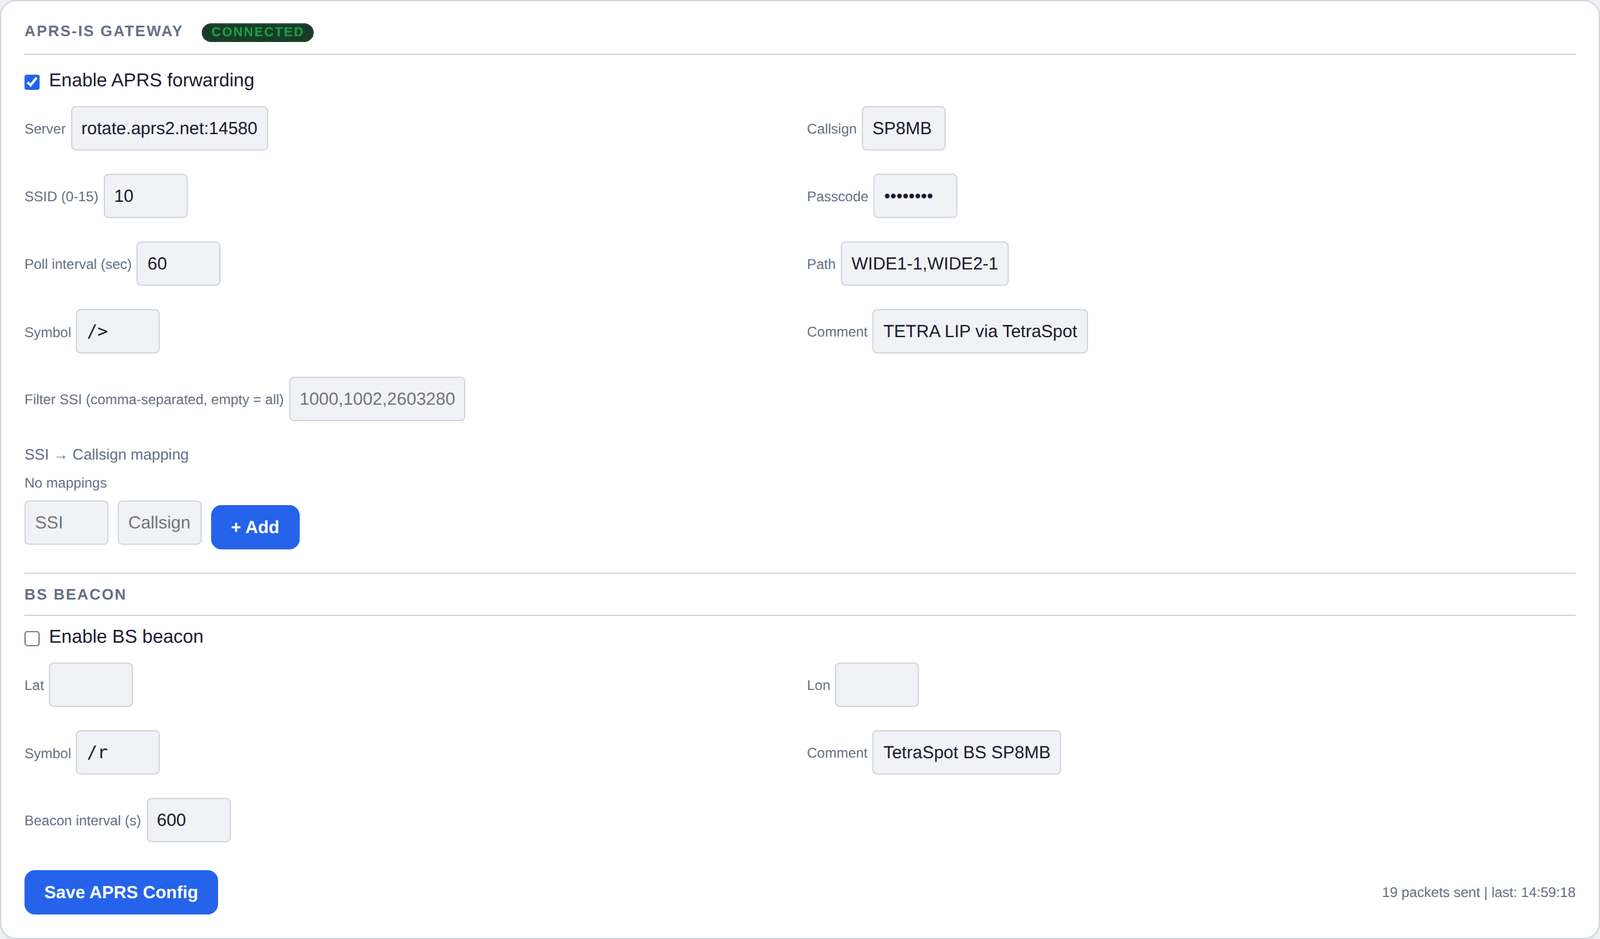
The important fields:
| Field | Meaning |
|---|---|
| Callsign and SSID | your callsign; SSID 10 conventionally marks an internet gateway |
| Passcode | the APRS-IS verification code derived from your callsign — nothing is sent without it |
| Interval | how often positions are sent (minimum 10 s) |
| Symbol | map icon: /> car, /r repeater, /- house |
| Filter SSI | which radios to forward; empty = all |
| SSI → callsign | maps a radio number to a callsign |
| BS Beacon | the station's own fixed position: latitude, longitude, symbol, comment |
10Supplementary services
The Suppl. Services tab collects functions that sit "above" plain communication.
10.1 DGNA — adding a group over the air

Lets you give a radio a talkgroup without reprogramming its codeplug. Pick the radio, the group number and a mode: just placed in the folder, attached until the next registration, or permanently attached. You can also give the group a name shown on the radio's display.
10.2 Idle screen message (Home Mode Display)
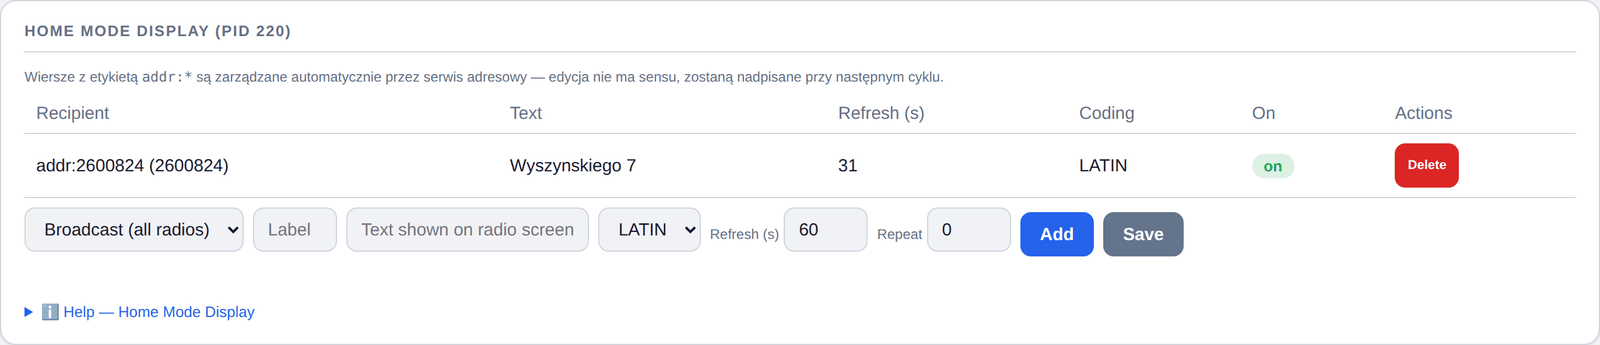
A short text the radio shows on its screen when idle. Address it to all radios, to one radio (ISSI) or to a group (GSSI). Entries form a list — after changing it, click save to apply.
10.3 Battery saving (Energy Economy)

Lets radios sleep between wake frames. Levels run from EG1 (~56 ms) to EG7 (~20 s). Cap grants only as much as the radio asks for; force imposes the level on every radio that requests sleep at all.
Stay with EG1–EG3. Deeper sleep is not yet reliable and the radio may miss incoming calls.
10.4 Remote station control
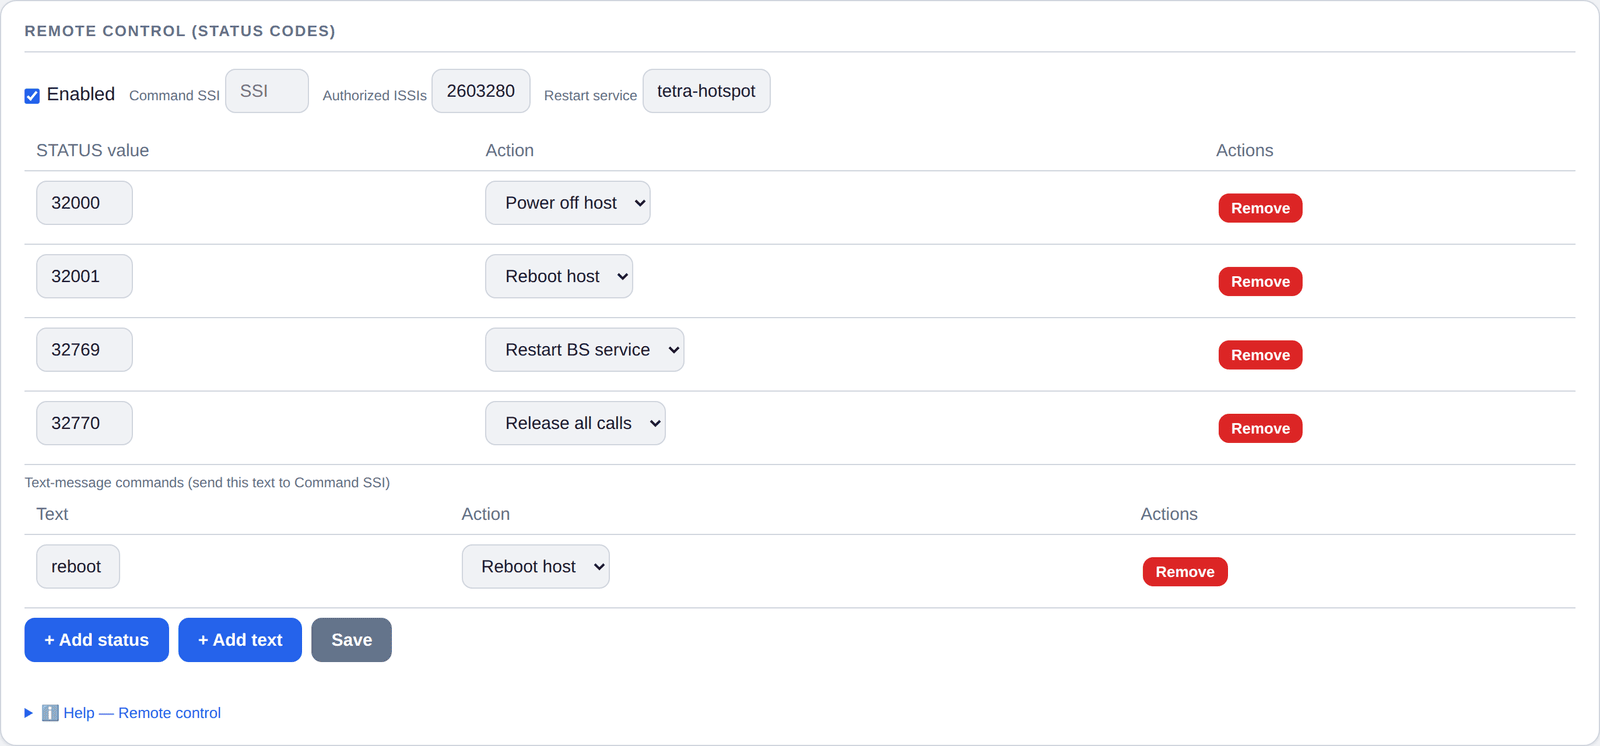
An authorised radio can control the station by sending a STATUS code (from the radio's Status menu) to an agreed number. By default: shut down, reboot, restart the radio service, and release all calls. Sending an agreed text works too.
Without encryption the sender's number can be spoofed. Only enable this on a trusted network, fill in the list of authorised numbers, and don't use an obvious command number. Remember that a shutdown cannot be undone remotely — somebody has to power the station back on physically.
10.5 Dispatcher services
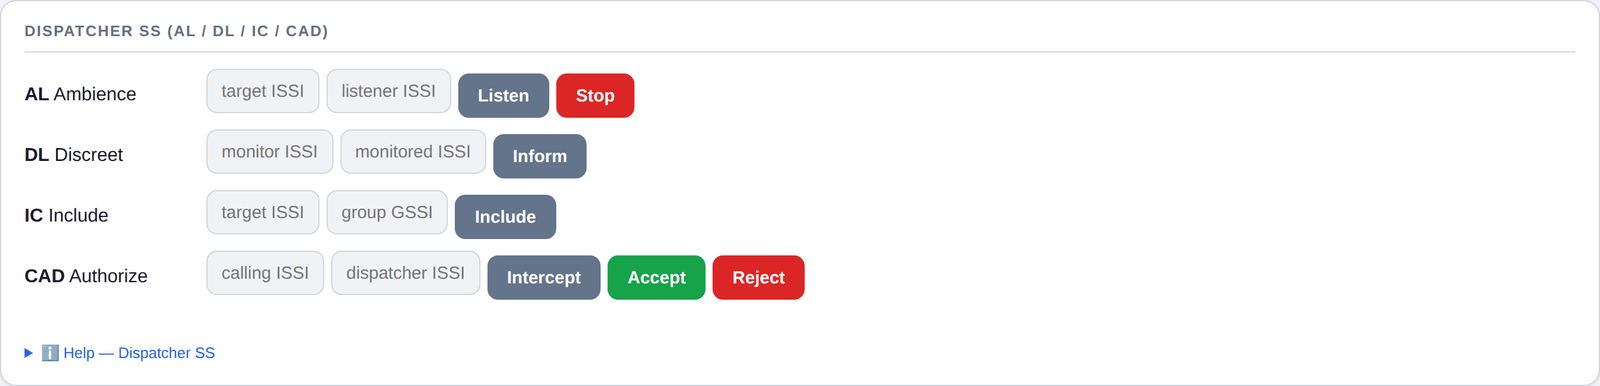
Four functions initiated from the panel: remotely opening a radio's microphone, discreetly monitoring a conversation in progress, pulling a radio into an ongoing call, and authorising calls as dispatcher. The same tab also holds call barring, caller-ID hiding and forwarding.
10.6 Street address on the display
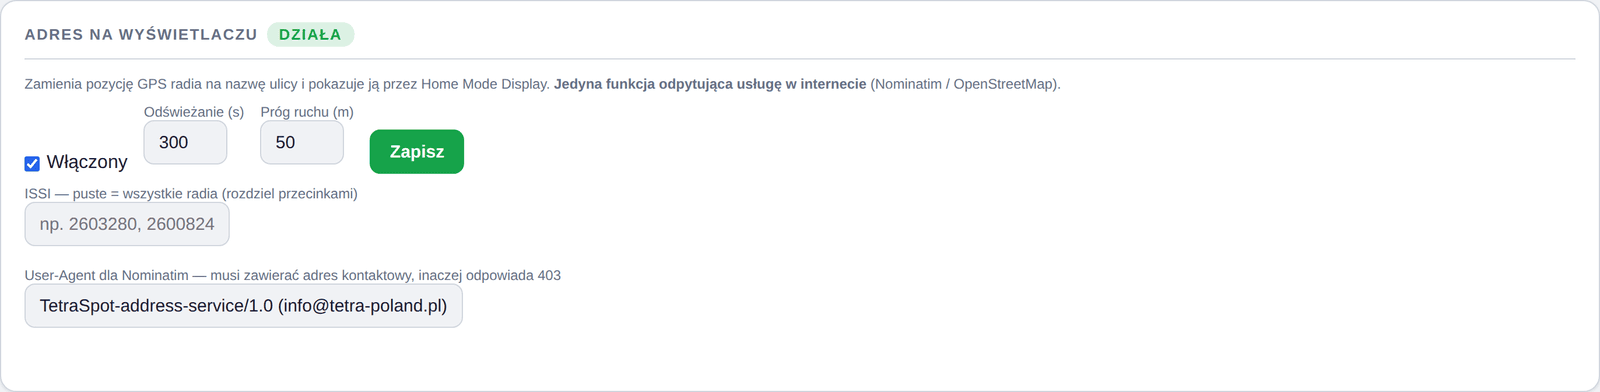
Tells radios which street they are standing on. It takes the radio's GPS position, turns it into an address and pushes it to the display as a Home Mode Display message.
| Field | Meaning |
|---|---|
| Enabled | starts the service |
| ISSI | which radios to describe; empty = all radios with a known position |
| Interval | how often to refresh (minimum 30 s) |
| Minimum movement | re-check the address only after moving this far |
| User-Agent | required by the external address service; must contain an e-mail address |
Without a proper User-Agent carrying a contact address the geocoding service refuses to answer — the panel will not let you save such a configuration, so the service can't look configured while every lookup fails. Don't lower the minimum movement without reason either: it stops the external service being flooded with queries about stationary radios.
The service writes its own entries onto the Home Mode Display list. Don't edit them by hand — they are overwritten on the next refresh.
10.7 Remote control of position reporting (LIP)

Controls how often radios report their position. After a radio's first GPS report the station tells it to enable reporting and asks for any backlog.
Switching this off means the station leaves the radio's own settings alone — positions arrive only as often as the codeplug dictates.
10.8 Call forwarding

Forwards incoming calls to another number. For a given radio you set the destination and the condition — for example when the radio is unreachable or does not answer.
10.9 Caller ID (CLIP / CLIR)
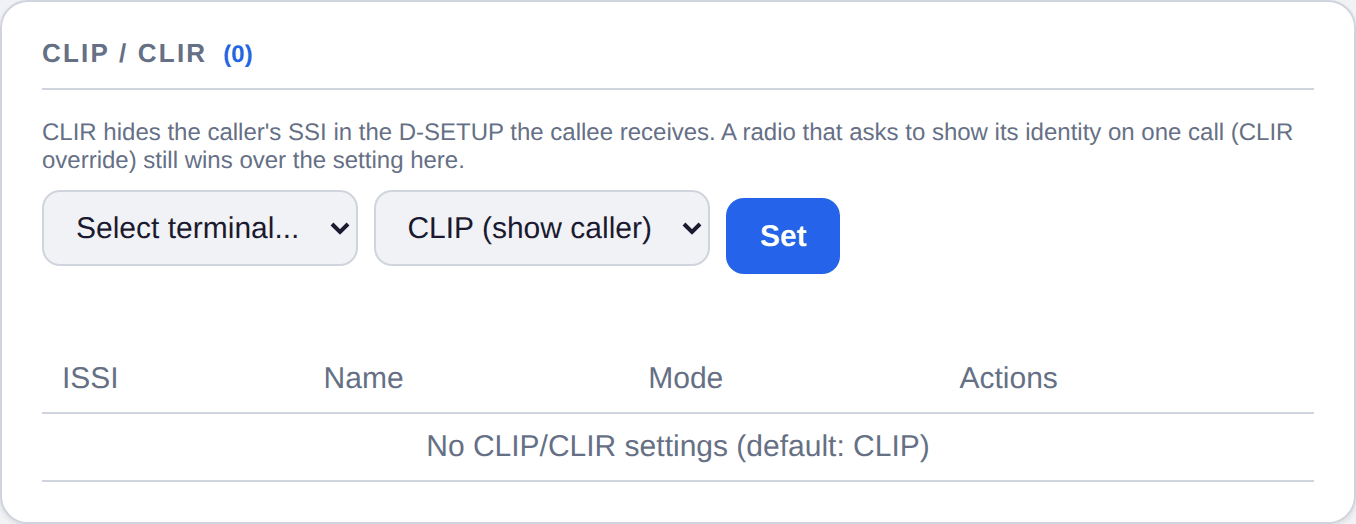
Controls whether the caller's number is shown:
- CLIP — the called party sees who is calling.
- CLIR — the caller's number is withheld.
Set per radio.
10.10 Call barring
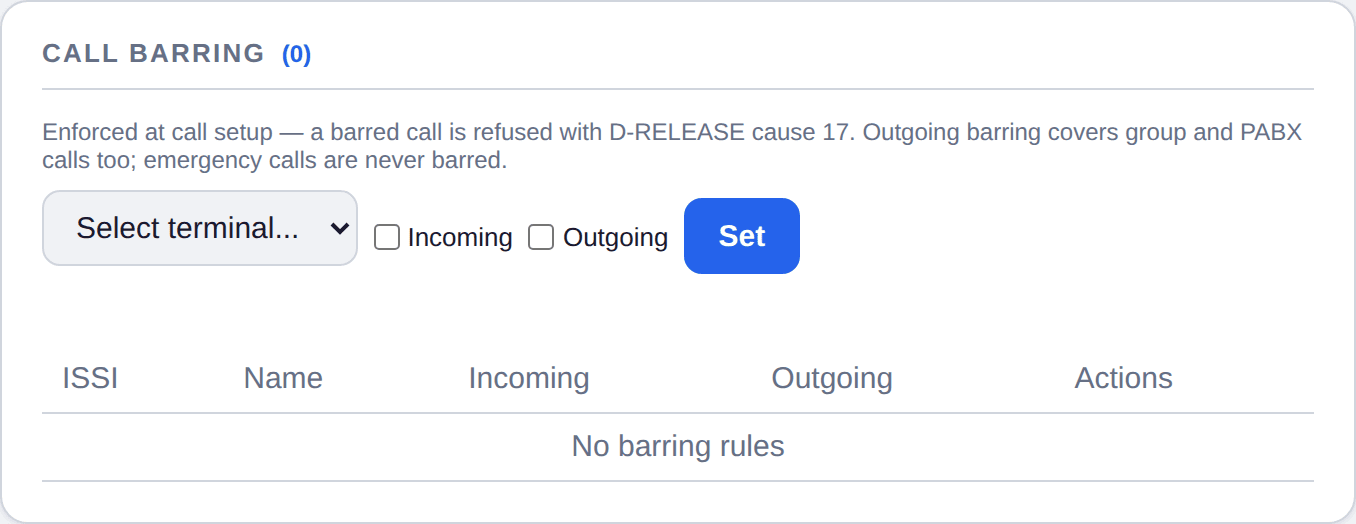
Blocks a radio from making or receiving calls. A barred call is refused right at setup — the radio is told the call was denied.
Useful when a radio has ended up in the wrong hands, or should only work in one direction.
10.11 Speaking clock
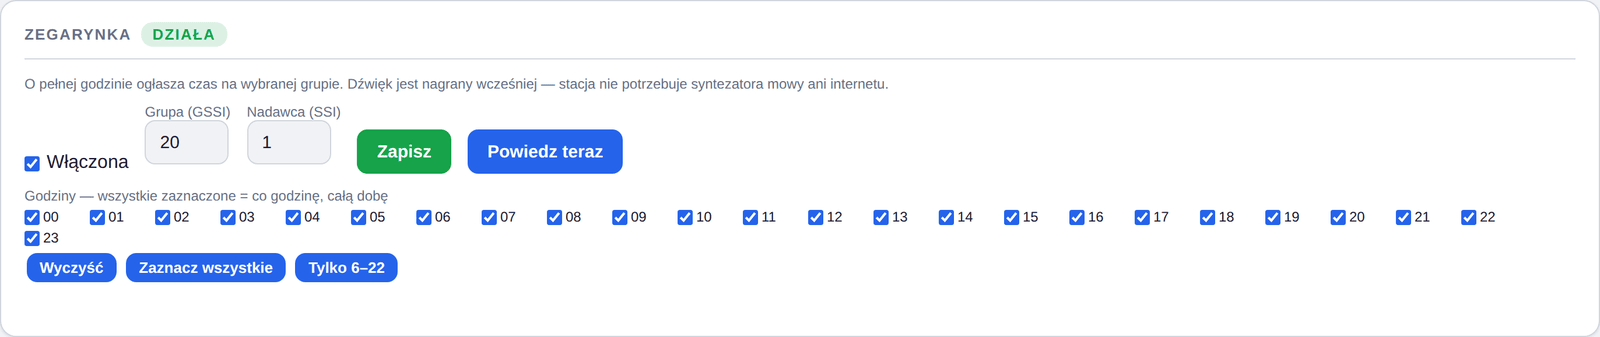
Announces the time on a chosen group on the hour. You pick the group, the number shown as the caller, and the hours (an empty list means around the clock). A test button plays the current hour immediately without touching the schedule.
11Packet data
Packet data gives radios internet access over the TETRA network: the station leases them an IP address and passes their traffic on. Bringing it up has two sides — the station and the radio. Nothing works without the radio-side settings, even when everything on the station shows green.
11.1 How it works
The radio establishes a PDP context — a data session. The station then leases it an IP address from a pool (10.0.0.2–10.0.0.254 by default) and passes all of the radio's traffic through itself to the internet. The station's address on that subnet is 10.0.0.1, and it acts as both the gateway and the proxy server for the radio's WAP browser.
11.2 The station side

The Packet data tab shows:
| Field | Meaning |
|---|---|
| Service | whether packet data is enabled |
| TUN | the interface carrying radio traffic |
| IP pool | addresses in use versus available |
| Active PDP contexts | how many radios currently hold a data session |
The table below lists each session: the radio's ISSI, its leased IP address, the NSAPI (session number inside the radio), the state, and bytes sent and received. It refreshes every 5 seconds. A row appears the moment a radio activates a session.
Packet data must also be enabled under TMO → Service flags, or the radio will not even try. The address pool, gateway and traffic forwarding themselves are set through configuration files.
11.3 Radio configuration — Motorola / DIMETRA (CPS)
Everything below is set in CPS, under Codeplug → Data Services.
Packet Data Parameters
| Field | Value |
|---|---|
| Request a Dynamic IP Address | tick — the station assigns the address |
| Default Packet Data Mode | Data Only or Voice & Data |
| User Authentication | either way — CHAP is supported |
| User Name / Password | anything — e.g. tetra / tetra (see below) |
| Static IP Address | 0.0.0.0 (unused with a dynamic address) |
ℹ️ You may leave User Authentication ticked. The Motorola radio then sends a CHAP response while establishing the session, the station replies with CHAP-Success, and the session comes up. The protocol dropdown (CHAP/PAP) next to it makes no difference.
If you leave the option ticked, the radio requires a user name and a password. The station does not verify them — it accepts any CHAP response — so put in whatever suits you; our radios use tetra / tetra. These are not network access credentials.
WAP → Proxy Table 1
| Field | Value |
|---|---|
| Proxy IP Address | 10.0.0.1 — the station's address on the data subnet |
| Remote Port | 9200 |
| Force SAR | ticked (default) |
| SAR Group | 3 (default) |
| Bearer Index | 0 — points at Bearer Table 1 |
Motorola ships this as 0.0.0.0, which will not work. The proxy address and port are the second most common cause of a failed bring-up.
WAP → Bearer Table 1 — leave Motorola's defaults: Bearer Name = TETRA_PACKET, B-Type = 1, WDP B-Type = 0, Max Request Time = 45.
WAP → AP Table 1 — leave empty. The native TETRA packet bearer needs no separate access point.
WAP → WAP Parameters
- select Proxy Table 1 as the active proxy,
- set Homepage to
http://10.0.0.1:4440/wap— the station's built-in status page (registered radios, calls, address pool usage, uptime). A good landing page for checking that everything works.
11.4 Checking it works
- Switch the radio into data mode and open its browser.
- On the Packet data tab a row should appear with the radio's number and leased IP address, and the Active PDP contexts counter should go up.
- The UL/DL byte counters should climb as you browse.
If no row appears, the session was never established — the problem is on the radio or in authorisation, not in packet data itself.
11.5 When a radio won't get onto data
| Cause | What to do |
|---|---|
Proxy IP 0.0.0.0 instead of 10.0.0.1 | fix the address and port 9200 in Proxy Table 1 |
| Radio not on the whitelist | it won't even register to the network — see 15.1 |
| Service flag off | enable packet data under TMO → Service flags and restart the station |
| Wrong station | packet data only works where it has been brought up — check which station the radio is registered to |
11.6 Browsing limitations
The browser in the radio is WAP, not a modern browser. It will open lightweight http:// pages; modern HTTPS sites will not display. The station's built-in status page is written for this format and always works.
Packet data takes timeslots away from voice. One carrier has only three available (the fourth is the control channel). Assign all three to data and nothing is left for calls and registrations. Watch the Timeslots card on the Dashboard after every change, and if you need both voice and data, bring up the second carrier.
12Telephony — SIP and GSM modem
12.1 SIP / PABX
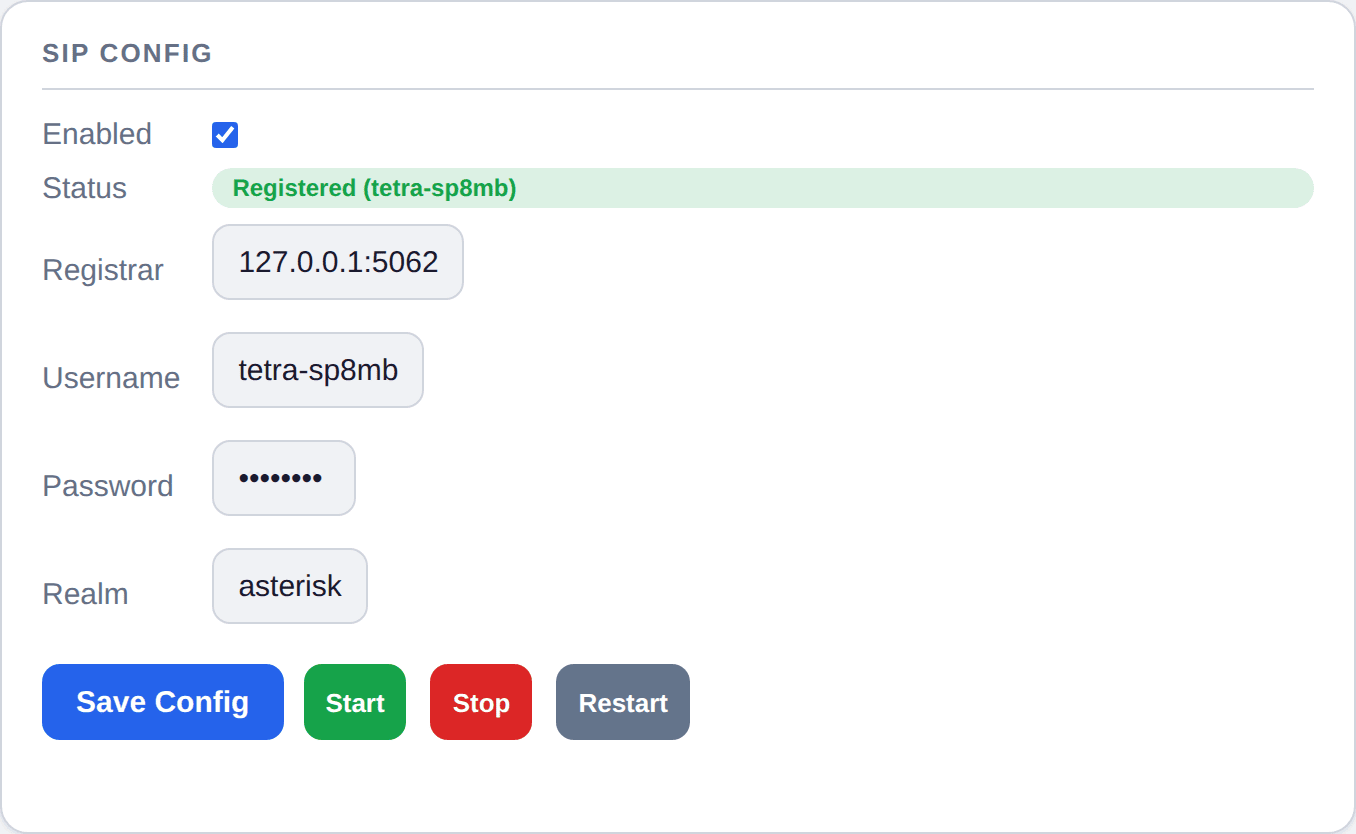
Connects the station to a telephone exchange: exchange address, username, password and realm. Below it, the number plan:
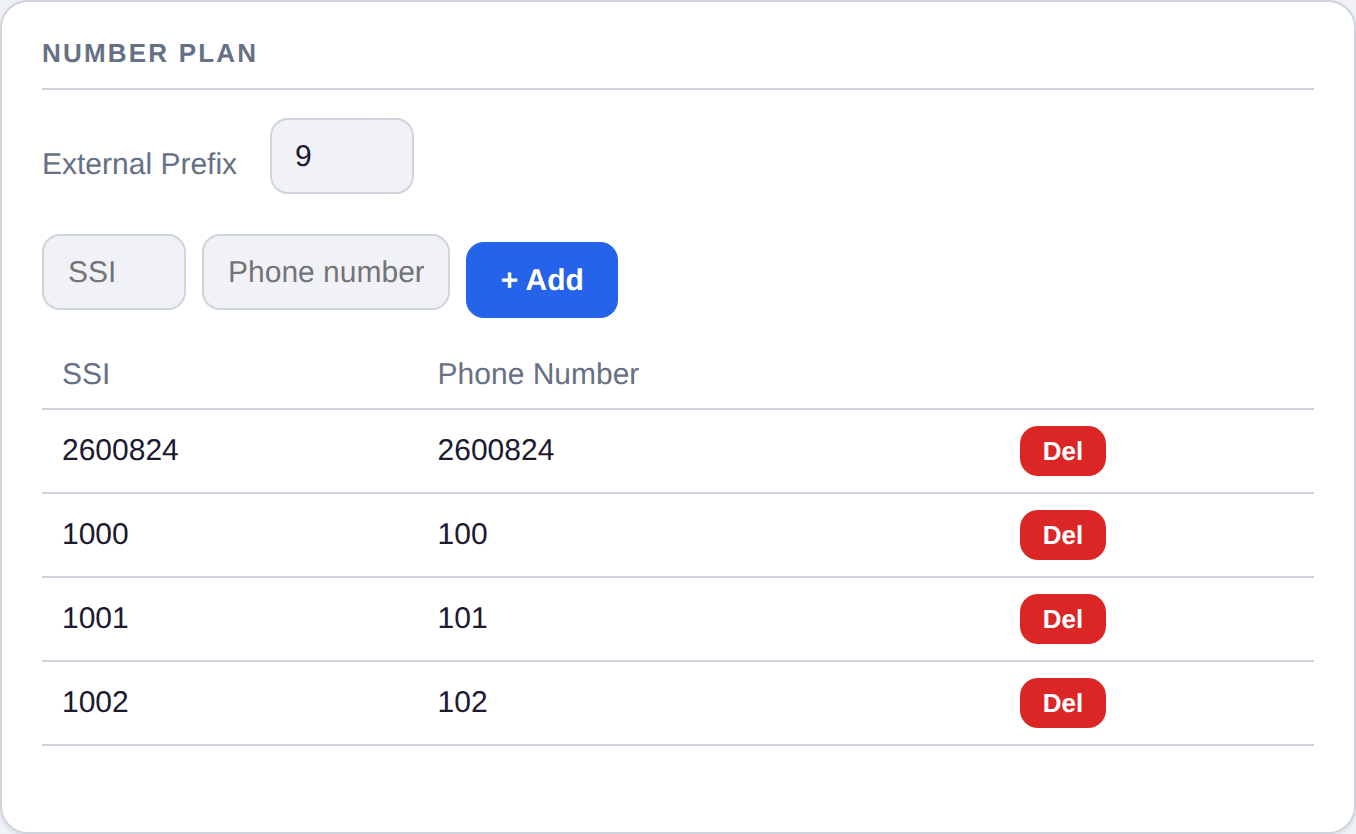
- External prefix — the digit a radio dials first to reach an outside line.
- SSI ↔ number mappings — which phone number reaches which radio.
12.2 GSM modem
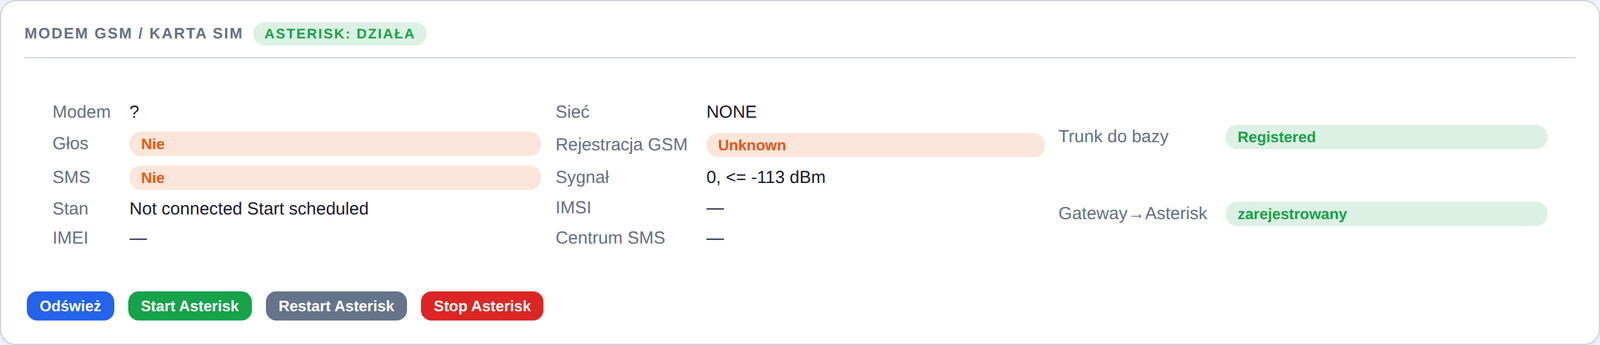
A gateway to the cellular network for calls and SMS. Incoming SMS arrive at the radio as SDS messages and vice versa. The card shows the state of the modem, the SIM and the phone service.
13System — services, logs, power
13.1 Station health

CPU load, memory, temperature and disk usage.
13.2 Power — voltage and throttling
This is the most valuable diagnostic card in the whole panel.
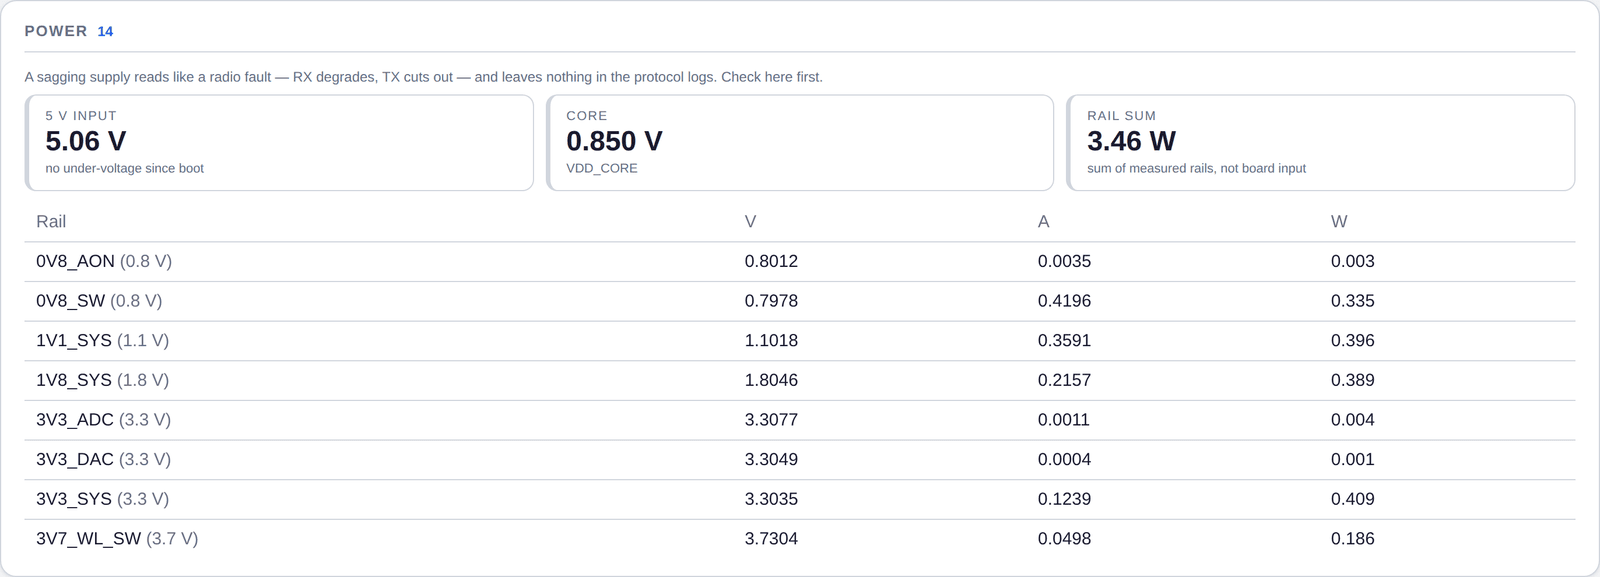
Why it matters. A sagging supply looks exactly like a radio fault: reception degrades, transmission cuts out, radios start dropping — and there is no error anywhere in the protocol logs, because as far as the software is concerned everything is fine. People spend a week retuning antennas and swapping coax when the culprit is the power brick or the USB-C cable.
The card shows three headline figures:
| Reading | What it means |
|---|---|
| 5 V input | supply voltage reaching the board. It should stay close to 5 V |
| Core | CPU core voltage |
| Rail sum | summed power of the measured rails — not the board's total draw, just an indication |
Below them is a table of every power rail with voltage, current and power. A rail that is off its nominal value is flagged.
Messages that need acting on:
| Message | Meaning |
|---|---|
| no under-voltage since boot | healthy — the supply has held up since power-on |
| UNDER-VOLTAGE NOW | the supply is collapsing right now — urgent |
| under-voltage happened since boot | it happened earlier; even if things look fine now, it was not a fluke |
| clock capped / throttled | the CPU has slowed itself down |
What throttling is. When voltage drops or the chip overheats, the CPU automatically slows down to protect itself. For a base station that is serious: radio signal processing has to keep up with TETRA's frame timing, so a throttled CPU starts missing deadlines. The symptoms are misleading — crackling, broken audio, failed registrations — and nothing points at power.
What to do when you see under-voltage or throttling:
- Fit a stronger power supply — a phone charger is not enough for a station with a transmitter.
- Replace the power cable. A thin or long USB-C cable can drop enough voltage that even a good supply doesn't help.
- Check the temperature on the Host card — throttling can also come from overheating, in which case you need better cooling, not a new supply.
Take an under-voltage reported even once since boot seriously, even if everything looks fine now. A supply on the edge of its capability collapses exactly when the station starts transmitting — the worst possible moment.
13.3 Services

Every station service, with start, stop and restart, and whether it starts automatically.
Restarting the central service (the switch) takes all the others down with it. They do not come back automatically — after such a restart, start the remaining services and the radio station again.
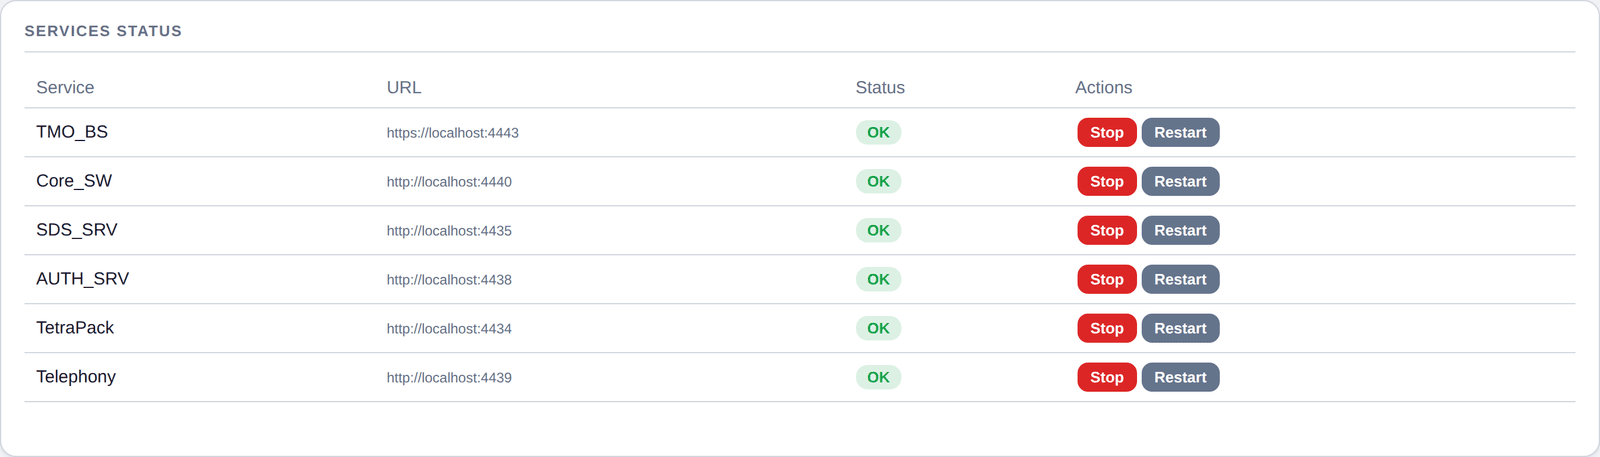
The Services status card is the at-a-glance check on whether every part of the station is answering. A red entry means a service is down — and usually explains why some panel function stopped responding.
13.4 Logs
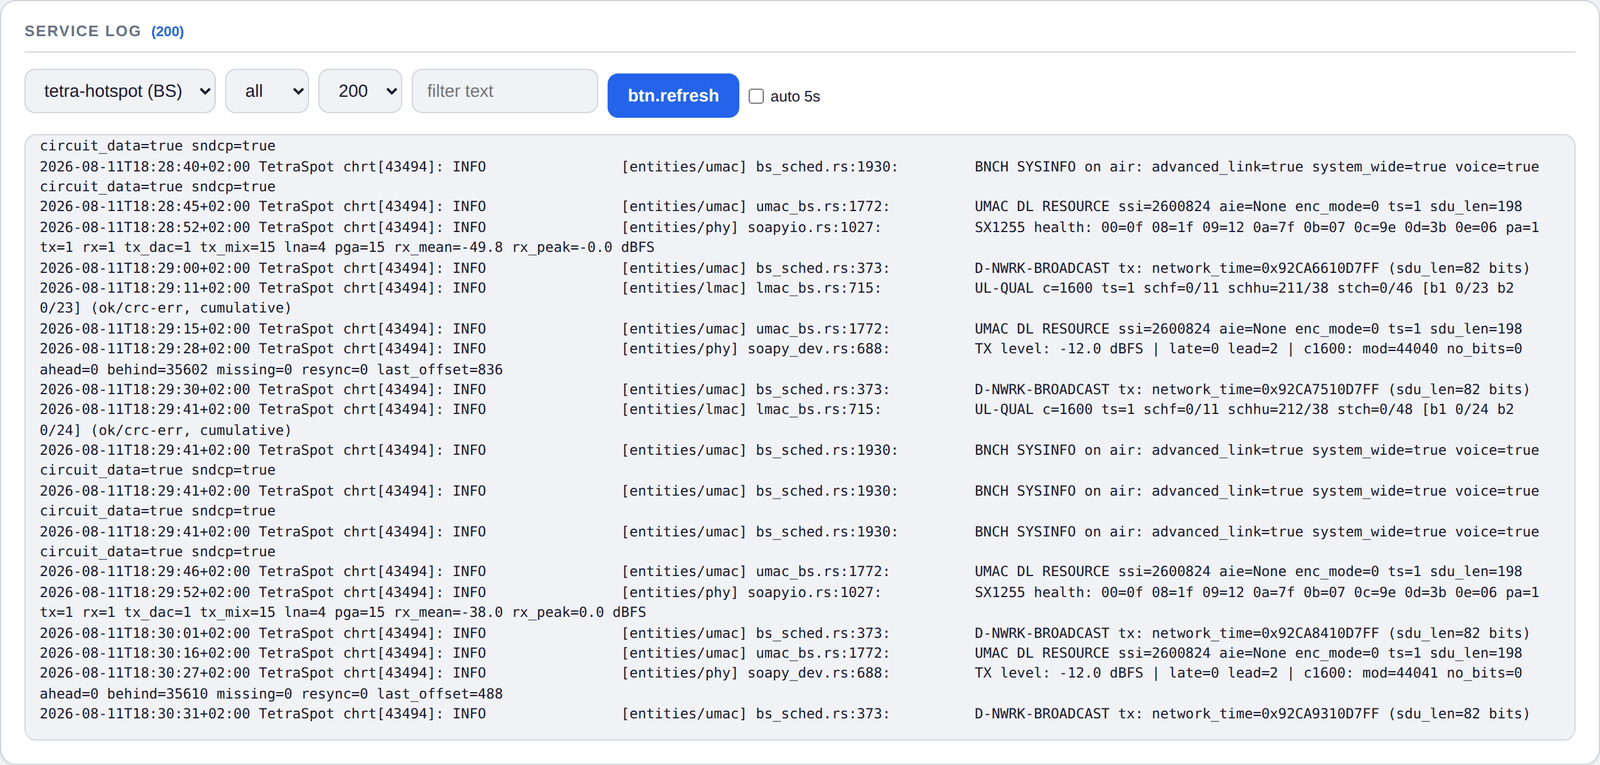
Live view of any service's log, with a text filter and auto-refresh. This is the first place to look when something misbehaves.
13.5 Settings

Panel language and the other global settings.

The station ISSI is the base station's own subscriber number. It appears as the caller for inter-station calls and when bridging outside. Changing it requires a restart of the central service.

Log level decides how much detail reaches the logs. The default is fine for normal operation; raise it while chasing a fault.
Don't leave the log level raised permanently — logs grow quickly and load the station.
13.6 VPN
The same tab handles VPN (WireGuard): key generation, installation, peer configuration and bringing the tunnel up. It lets you reach the panel of a station sitting behind a connection with no public address.
14Service tools
14.1 Codeplug
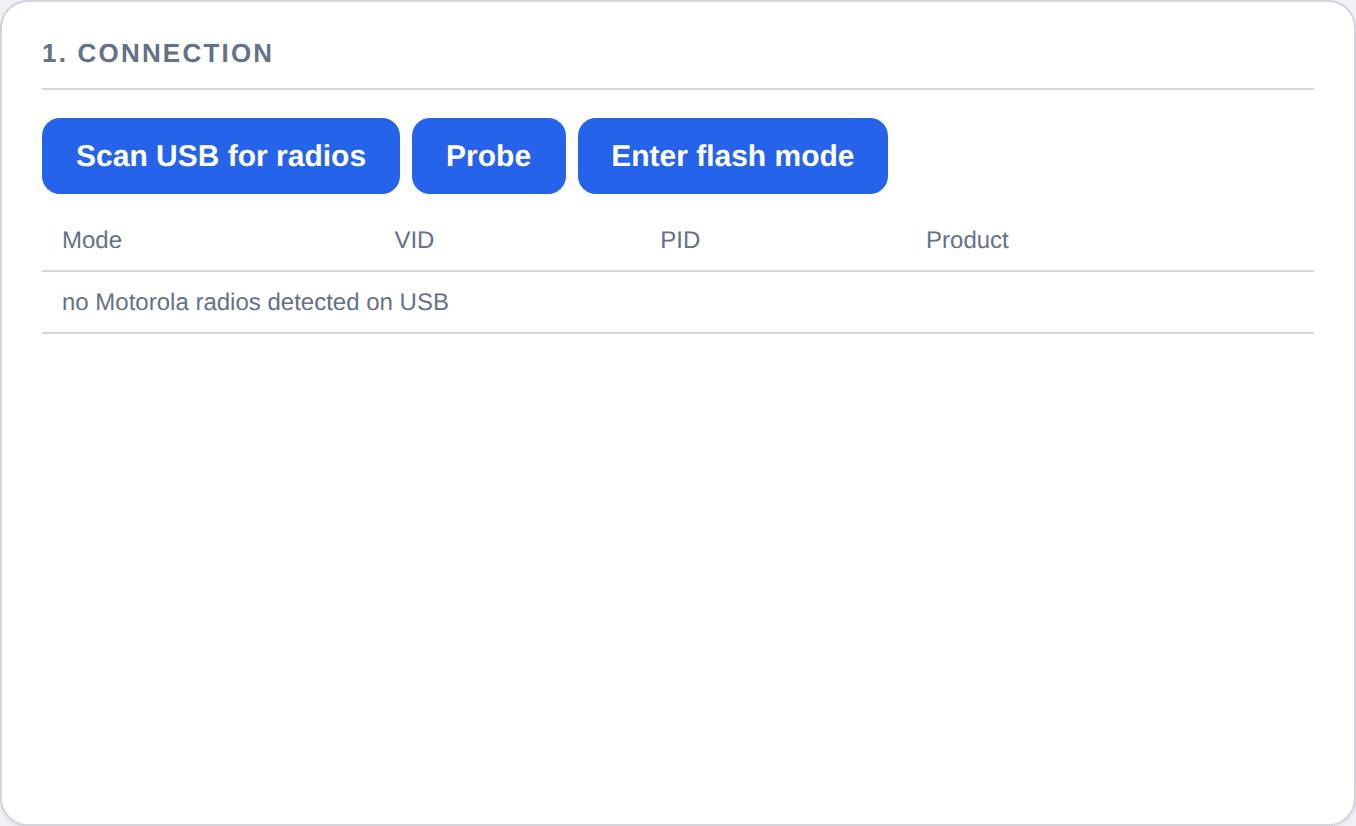
Reads and backs up a Motorola radio's configuration over USB. A codeplug backup is about 16 MB (~30 s); the full memory is 1.5 GB (several minutes). Tag files with the radio's TEI and a note so you can tell them apart later.
Editing a codeplug from the panel does not work yet — read and backup only.
14.2 Radio Info

Reads a radio's identity, network, signal strength, security settings and group list over the cable. It is read-only and deliberately does not switch the radio's mode, so it is safe to use on a radio that is in service.
14.3 Air Monitor

Shows what is happening on the air, using a radio as a measurement receiver. You see the most active groups and radios plus a breakdown of transmission types. Start and stop are explicit — enabling monitoring changes the radio's operating mode.
15Troubleshooting
15.1 A radio won't register
The most commonly reported problem. Check in this order — most likely cause first:
- Is the radio on the whitelist. Go to Security → Auth control. If Whitelist mode is on, only radios present in the Terminals (Auth DB) list and flagged Allowed can register. A radio that isn't on the list is refused even though it sees the station and has everything else right. Fix: add the radio (ISSI + name, Allowed ticked) or, while testing, turn whitelist mode off, which lets any radio in.
- Does the ISSI match. The number in the radio's codeplug must be exactly the one on the terminals list.
- Does the radio have a Ki, if authentication is on. With Use Ki for authentication enabled, a radio whose key doesn't match the one stored in the station will not register. This is also the usual cause of "the radio sees the station but keeps dropping" when Mutual Authentication is enabled in the codeplug.
- Do MCC / MNC / colour code / Location Area match — the TMO tab. For our network: MCC 901, MNC 9998.
- Is the transmitter on — Radio TX at the top of the panel must be ON.
- Is the signal getting through at all — too little transmit gain produces "the radio sees the carrier but cannot register".
15.2 Check in this order (other faults)
- Power supply — the System tab, Power card. Under-voltage and throttling look like a radio fault; see section 13.2.
- Services status — is everything answering.
- Logs — the System tab, the relevant service.
15.3 Common symptoms
| Symptom | Where to look |
|---|---|
| Radio sees the carrier but won't register | whitelist, Ki key or too little gain — 15.1 |
| Audio crackles, registrations fail | under-voltage or throttling — 13.2 |
| Radio registered but nothing is heard | group split and the radio's group assignment |
| Other stations can't be heard | Hub — Interconnect, Poland Client card |
| Groups 91+ don't work | BrandMeister login on the same tab |
| Calls break up when data is running | too many timeslots given to packet data |
| A service is "not responding" after a restart | the others didn't come up — System → Services |
| Station struggles under load | power and temperature — System → Power |
15.4 The governing principle
A restart is not a fix. If something needs restarting regularly to keep working, the problem is elsewhere — and that is where it needs finding.
This manual describes panel version v1.0.
This manual covers panel version 1.0.