HowTo

Build your own TetraSpot.

The complete guide: what to buy, how to put it together, how to set up the system and where to get the software. One afternoon, no soldering iron required — everything plugs together. The result is your own TETRA station visible on the network map.

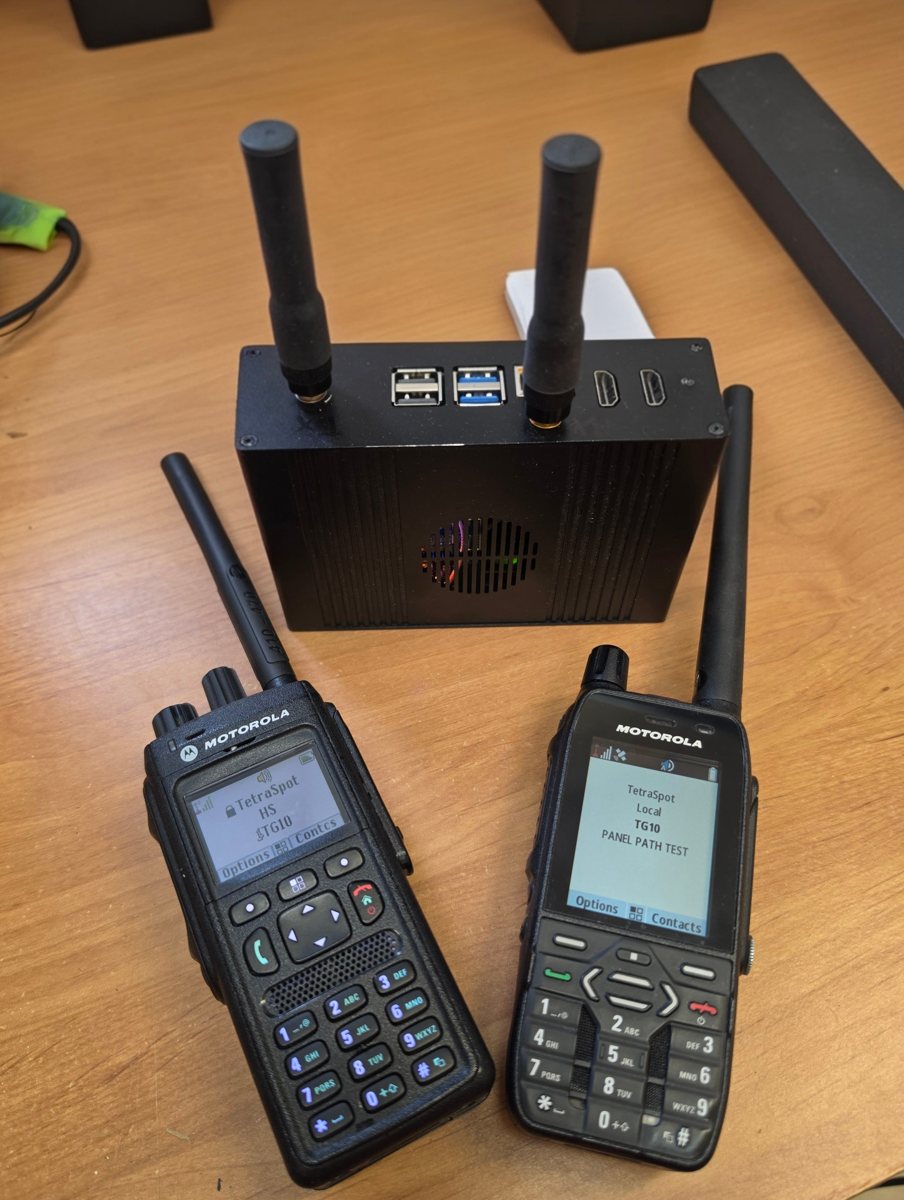
Finished TetraSpot — Raspberry Pi 5 in a case with two antennas and two Motorola radios registered to the network
The goal: TetraSpot HS — two antennas bolted to the case, radios registered on TG10.

Before you start

  • No soldering — everything connects with plugs and screws
  • You need a Phillips screwdriver and an 8 mm spanner for the SMA nuts
  • Assembly takes about an hour, the system and setup about the same
  • Transmitting requires an amateur radio licence
You transmit under your own callsign. TetraSpot operates in the 430–440 MHz amateur band, so the usual rules apply — operator certificate, radio licence and the band plan.
01 — Shopping list

Eight things, that's all.

Nothing here is arbitrary — for every item we explain why it has to be that one, because three of them are easy to get wrong: the memory card, the power supply and the cooling.

RequiredSoC

Raspberry Pi 5

Minimum 2 GB RAM · version 5 recommended

The heart of the station — the whole TETRA stack runs in real time on the CPU. Get a Pi 5 with at least 2 GB of RAM. A Pi 4 will run it too, but expect stability problems — we explain why in the questions below.

RequiredHIGHENDUR.

High Endurance microSD card

32 GB · class A2 / U3 / V30 · “High / Max Endurance” series

TetraSpot writes logs and recordings continuously, 24/7. An ordinary card dies after a few months of that — High Endurance cards (SanDisk Max Endurance, Samsung PRO Endurance) are built for sustained writing.

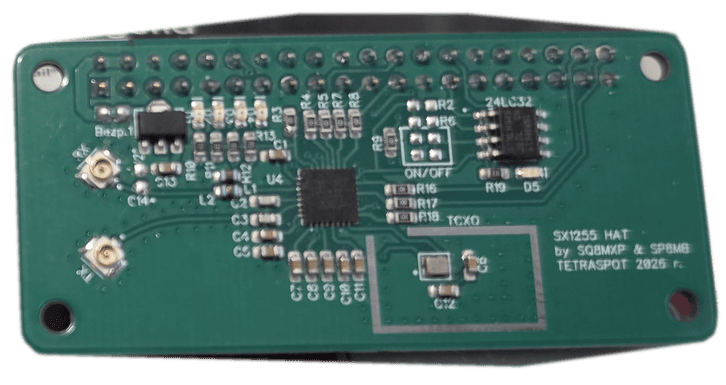
RequiredTMO HAT — the SX1255 HAT board designed by SQ8MXP and SP8MB

TMO HAT (SX1255)

RX 430 MHz · TX 440 MHz · TCXO · 2× U.FL

Our own design (SQ8MXP and SP8MB) — an SDR board that plugs straight onto the GPIO header and handles the entire radio side. Every board is calibrated in-housebefore it ships, so the local oscillator leakage is already dealt with and there is nothing for you to trim. Costs about 350 PLN; for availability contact SP8MB, as the boards are made in batches.

Required5A

Official USB-C power supply

Raspberry Pi 27 W USB-C PD · 5.1 V / 5 A

This is not the place to save money. A Pi 5 with a radio board can draw serious current in bursts; a phone charger ends in throttling, reboots mid-transmission and a corrupted memory card.

Required

Active cooling

Official Active Cooler or a case with a fan

The station runs DSP non-stop inside a closed case. Without a fan the Pi hits its thermal limit and drops its clock — you hear that as choppy audio.

RequiredU.FLSMA

U.FL → SMA pigtails

2 pcs · 10–15 cm · panel-mount SMA female

The HAT has tiny U.FL sockets, antennas use SMA — the pigtail bridges them and brings the connector out to the case wall. Get the panel-mount version (with a nut) so the antenna bolts to the case instead of dangling on a cable.

Required

70 cm antennas

2 pcs · SMA · 430–440 MHz

Separate antennas for transmit and receive — TetraSpot works in duplex, transmitting and receiving at the same time. Space them as far apart as you can; the better the isolation, the more sensitive the receiver.

Required

Enclosure

3D print or aluminium · 2 holes for SMA

What matters is being able to bolt the antennas to the case — the SMA connectors pass through the wall. A 3D print is perfectly fine; aluminium additionally shields and carries heat away.

Complete from~1300 PLNRaspberry Pi 5 with accessories, the TMO HAT and a used TETRA radio. The 10 W BTS variant adds roughly 2000 PLN more (driver, class-A power amplifier, duplexer, filters, rooftop antenna).
02 — Assembly

Four steps, no soldering.

The whole thing goes together with a screwdriver. The only part that needs a light touch is the U.FL connectors — they are tiny and hate sideways force.

01

Seat the HAT on the GPIO header

Push the TMO HAT onto the 40-pin header — straight, all pins at once, no tilting. Bolt it down on M2.5 standoffs: without them the board flexes when you plug in the pigtails and eventually cracks.

02

Connect the U.FL pigtails

Press the U.FL plugs onto the RX and TX sockets — straight down, with a finger or a plastic tool, until they click. The connector is rated for a few dozen cycles, so treat it as a one-time connection, not a serviceable one.

03

Mount the SMA connectors in the case

Push the panel-mount ends of the pigtails through the holes and tighten the nuts from outside (8 mm spanner). Route the cables so they do not rest on the heatsink or block the fan.

04

Close the case and fit the antennas

Cooling, ventilation, lid — and the antennas last. Space them as far apart as you can. Never transmit without antennas connected: the power stage would be driving into an open circuit and can be damaged.

03 — Raspberry Pi OS

The system in five steps.

A fresh Raspberry Pi OS, two interfaces to enable and a quick check that power and cooling hold up. Nothing beyond the standard procedure.

01

Flash Raspberry Pi OS

Download the Raspberry Pi Imager and pick the latest Raspberry Pi OS (64-bit). 64-bit is mandatory — the stack will not run on a 32-bit system.

02

Configure everything before the first boot

In the Imager open the settings (the gear icon or Ctrl+Shift+X) and set the hostname, a user with a password, your Wi-Fi network and enable SSH. That way the station never needs a monitor or keyboard.

03

Log in and update the system

Insert the card, apply power and log in over SSH after a moment:

ssh pi@tetraspot.local

sudo apt update
sudo apt full-upgrade -y
sudo reboot
04

Enable the hardware interfaces

The HAT talks to the Pi over SPI and exposes its ID memory over I2C. Enable both in raspi-configInterface Options:

sudo raspi-config
   Interface Options -> SPI -> Yes
   Interface Options -> I2C -> Yes
sudo reboot
05

Check power and temperature

Before going further, make sure the power supply and cooling are up to it. throttled=0x0 means nothing is limiting the CPU — anything else means a weak supply or too much heat.

vcgencmd get_throttled
vcgencmd measure_temp
04 — Software

The TetraSpot package.

The TETRA stack installs as a ready-made package with systemd services — once installed the station starts together with the system and everything is configured from the browser.

The package is still being built. We are finishing the installer — until the public release we hand out test builds individually. If your hardware is already assembled, get in touch with SP8MB and you will receive the package together with setup instructions.

What the package gives you

05 — Questions

Before you order.

Do I need an amateur radio licence?

Yes. TetraSpot is a transmitter operating in the 430–440 MHz amateur band, so you need an operator certificate and a radio licence, and the station runs under your callsign. Without a licence you can build the hardware and listen, but not transmit.

What does it all cost?

The TMO HAT is about 350 PLN, the rest of the electronics a few hundred more, and a used TETRA radio starts at around 400 PLN — the whole build usually lands near 1300 PLN. Details and the 10 W BTS variant are described on the home page.

Will it work on a Raspberry Pi 4?

It will run, but do not count on stable operation. Audio from the HAT arrives over I2S via DMA and the program has to drain the buffer before it fills up. When the system is busy writing logs or doing something else, the process falls behind and drops samples (an XRUN) — you hear that as clicks and broken audio. The Pi 5 has the headroom in CPU and memory bandwidth that the Pi 4 simply lacks.

What about a regular PC?

Yes — besides the Raspberry Pi the stack runs properly on x86-64, so a mini PC is a sensible alternative if a small enclosure is not a priority.

Do I have to use your HAT?

No — TetraSpot supports the SX1255, AD9363 and AD9361 chipsets, so in theory any board built around them will fit. What decides the quality, though, are three things: the TCXO reference, the filters and the calibration. A weaker TCXO drifts with temperature — the station heats up inside a closed case, the frequency wanders off and terminals start losing synchronisation. Poor filters pass through what they should be cutting out. And a third-party board will most likely arrive uncalibrated, leaving the oscillator leaking right in the middle of your own channel and degrading the signal you transmit. The TMO HAT is simply the easiest route: it plugs straight into the Pi, costs about 350 PLN, comes calibrated and there is nothing to source yourself.

Where do I get a TMO HAT?

The boards are made in small community batches — for one, contact SP8MB or ask on the TETRA-POLAND Telegram group.

Are two antennas really necessary?

With this design, yes — TetraSpot transmits and receives simultaneously (10 MHz duplex), so the RX and TX paths have separate outputs. The alternative is a duplexer and a single antenna, but that belongs to the far more expensive BTS variant.

What does it take to turn this into a full BTS?

The HAT alone gives you hotspot power. A base station adds a driver, a power amplifier, a duplexer and filters. The amplifier is the awkward part: TETRA uses a non-constant-envelope modulation (π/4-DQPSK), so the PA has to run linearly, in class A — otherwise the spectrum spreads and you start interfering with the neighbouring channels. The price of that linearity is poor efficiency and a serious amount of heat to get rid of. The duplexer lets you work off a single antenna, and the filters keep you from spilling outside your own channel.